Showing posts with label Machine Quilting. Show all posts

Friday, October 7, 2016

Autumn's Song

I'm still squeezing in time for quiltmaking, knitting, tatting, etc. between therapies for my knee and teaching full time, although that would be difficult to discern from my blog posts.

Yesterday, in addition to physical therapy, I made a quick run to Busy Bee Quiltshop at Edgewood, NM to add some oranges to my supply for autumn quilt blocks. This may be somewhat shocking since I absolutely do not like orange (except in my juice glass and a few other things).

Over the last several weeks my sweet students Maddie and Isabella have worn a some very distinctive clothing in these colors to school. (Isabella even has a pair of amazing heliotrope shoes.)

So, I had to come home and piece some blocks in honor of autumn.  The little quilt below was made mostly from stash.  Some of you may recognize one of Jinny Beyer's Palette  fuchsia blenders, from the late 1980s, I believe.  It's one of those fabrics I treasure and occasionally add to a quilt.
 I have a good friend with a birthday later this month, so I need to get the binding on this so she can use it to celebrate autumn.

 This was so much fun to piece and quilt!  However, since my happy heart has not yet had enough of these blocks, I've revised it as shown above in the second photo. I'm thinking of making another revision as well.


 The border is adorned with happy feathers and vines, and the next little quilts are expected to receive the same kind of border treatment.


I'm still carrying my tatting with me for when I get stuck in other people's time warps, and since I started a sweater, via Myra Wood's Craftsy class, The Perfect Fit Seamless Crazy Lace Cardigan,
 I usually have some knitting with me.  I seem to get caught in those other-people's-time-warps whenever I leave my knitting or tatting at home!

My daughter has decided to pursue her master's degree in materials science and engineering with an emphasis in metallurgy.  Nineteen years ago today I was in China, frustrated by the things my agency had decided I must see and do before I could actually meet her and hold her in my arms.  She has come far in countless ways.  I admire her determination, her intelligence, and, most of all, her fine character and inner beauty.  In many ways she is a Phoenix. She's beautiful on the outside, but it's the inner beauty that is the blessing she brings to the world.

Happy quilting, knitting, and creating,..

Wednesday, July 20, 2016

Gone Fishing--A Prayer Quilt

I think Ruth created this pretty little prayer quilt.  I had fun quilting it with a lot of new improvised quilting designs.


She chose wonderful fabrics that made quilting this even more fun.  We're trying to get quilts finished for an upcoming prayer quilt blessing.

Weather:  I'm starting to think that the purpose of thunder is to taunt us about rain that will fall elsewhere (not at my house) or will evaporate before it hits the ground (virga).  In the last several days I've heard a few drops hit the skylight.  I'm thinking a huge percentage of New Mexico's rains are three inch rains--drops three inches apart and lasting no more than three minutes.  I'm kind of hoping our luck will change!

Happy quiltmaking......,

Monday, July 4, 2016

Summer Romance I: Quilting Update

I've been quilting and taking a few photos to make the rest of the quilting easier.  I love quilting and using lots of variations to add interest to the quilt.

 I have no idea how all the variations would be received in a quilt show.

 However, through all my years of quilting prayer quilts, I developed a practice of stitching a variety of variations because it seems to me that when someone is too sick to do much of anything, he or she might find the variations somewhat like a puzzle.

 That idea now carries over into all my quilts.

 It's also true that doing exactly the same thing over and over again would not keep me as well engaged when I'm quilting.

 I'm tying and burying knots, but only in the white.

 The stops and starts, fortunately, are not at all obvious except in the white.

Not to the halfway point yet, so probably lots of photos ahead.

Happy Quiltmaking and Knitting,......

Saturday, July 2, 2016

Summer Romance I Quilting: Corners

Yesterday I stopped and fiddled in my sketchbook to decide what to do in the corners.
These were both possibilities.

However, I do like to draw spines into the quilt, and I knew my blue and purple markers were almost dry, and Busy Bee Quilts was having a 25% off sale on everything if I got there before ten.  They were out of blue markers, but one of my favorite clerks talked me into buying Frixion markers--which I've been terrified to use.  She told me that if I got them and didn't like them, she'd buy them back from me.  So I bought a package, came home, wrote all over a white scrap and watched in amazement as it disappeared in seconds with heat from the hair dryer.  Okay, I was willing to try it on the quilt (and am hoping it will never reappear, although I do launder my quilts). Yes, I have friends who swear by them, but I was still skeptical.


Of course, when I actually stood in front of my quilt, I changed my mind about how to quilt it.
Quilts do have a way of speaking about what they want.
These large corners are going to feature what I sometimes call the Oklahoma Seed Pod, which is the larger portion of the photo above.  I call it that because I've only seen it on one other quilt (except for mine), and that was made in 1903 in the Oklahoma Panhandle.  I traced the design sometime around 1986 and love to use it and a few of its variations in my quilts.

For some reason, I was really struggling with the quilting today; then it occurred to me that I had invested in Hartley Micro-handles, so they went on the machine, and I'm doing better now--although I still seem to be doing sub-par work for me.  Nevertheless, after I take this break, I'm going to get back to work.

I'm also very unhappy with how much my starts and stops show up, so I'm going to start tying off and burying my knots--which will be pretty easy and fast for me after several decades of hand quilting, but will take more time than anchoring by machine.

Before my daughter left for her manicure and a few hours with her best friend, she came into the quilting studio to tell me goodbye, and asked, "Is that quilt for us?"  Yes, it will be part of her inheritance, but I hope to sleep under it for several decades first.

Happy quiltmaking and knitting,...


P.S.: I'm getting some lovely comments from no-reply commenters (is that a word?) to which I cannot respond.  So if you are a no-reply commenter (you might want to check your profile to be sure you have it set the way you want it set), please know I'm not being unappreciative or ugly about what you have to say.

Post Post Script:  Yes, I'm still quite nervous about the Frixion pens, but if white lines appear, they will at least be white lines on white fabric.

Wednesday, June 1, 2016

A Group Quilt

A couple months ago, or, maybe, several, one of the ladies in our Victory Prayer Quilts Group suggested we come to the meeting with charm packs or layer cakes, she'd bring, white, and we could each make a quilt from a pattern she would bring.  I think the pattern is from a Missouri Star tutorial.

I took an Eleanor Burns layer cake, thinking I'd put it with white to make another pattern.  The lady forgot the white.  Ruth brought quite a few charm packs and suggested we use some of those.  The lady also brought sets of strips she had already cut to be used in charm pack quilts.

When I got there and couldn't make the quilt top I had planned, Ruth told me to use some of her charm packs with the strips.  This quilt is the result.

Here's the quilt in last Sunday's sun in the church narthex.

From a different angle:

I love text prints, but almost never see any when I'm buying fabric.  This text was printed in multiple colors and recalled a Paris exhibition at the beginning of the 20th century (or end of the 19th).

It quilted beautifully.
 If our championship binding lady hadn't moved away a year ago, it could have been a four-person quilt.

Happy quiltmaking,

Thursday, July 3, 2014

Tutorial: Quick Patriotic Wall hanging

This Patriotic Wall hanging or Door Decoration is very quick to piece--and can be very quick to quilt if the quilter chooses to stitch in the ditch.

Because this is a tutorial, it has many, many pictures and will take a while to load on slow or crowded connections.

Please read all directions thoroughly before beginning this project.


This project was made from 1 fat quarter of blue, two fat quarters of red, and about 5/8 yard of white.

I used Michael Miller's Fairy Frost--mostly because the quilt shop didn't have red, white, and blue batiks.

This project would work equally as well if made from stash fabrics, left over jelly roll strips (although it would still need a fat quarter of the blue), or a variety of scraps.

I also used some scraps of thin white batting behind the raw edge stars, and 32 x 36 inch pieces of white batting (Quilter's Dream Request or Mountain Mist Rose are nice and drapy) and white bleached muslin.  A very low contrast, very light colored backing would work as well.

Cutting:
From 1 red fat quarter cut 2.25 inch strips for binding and put aside.
From the second red fat quarter, cut 7 strips 2.5 inches x 22.5 inches (in other words, from the longest side of the fat quarters)  Does not have to be exact because we'll be trimming the to 20.5 inches.
From white, cut 8 strips, 2.5 inches x 22.5 5 inches (or 4 strips the width of the yardage).
From the blue, cut one 10 1/2 inch X 18 1/2/ inch rectangle and two 2/12 inch rectangles.

Piecing:
Piece three red/white sets of strips.  

Sew a red strip to just one pair so that you have a red/white/red set.  Then piece all sets together so that you have a set of red and white strips with red on each end, for a total of seven alternating stripes in the set. Red/white set of strips should be 26.5 inches wide.  Trim so that the strips are 20.5 inches long (although they may be longer if so desired).

Cut one white strip into two 10.5 inch rectangles and piece each white rectangle to a 2.5 inch blue rectangle.  Stitch each white edge to the 10.5 edge of the large blue rectangle. Check to be sure the new blue/white section measures 10.5 inches x 26.5 inches.


Press all seam allowances away from the white.

Pin the blue/white section to the red/white section, and stitch together.  I found it was easier to keep the red/white section on to of the blue/white sections so I could keep all the seams turned in the correct directions. The only slightly tricky part is that the two outer seams on each side of the blue/white section will not nest--but that's because we want to avoid any shadowing in the white that could be created by nesting seams.


This completes the piecing of the top.  Press top and layer with batting and batting.  I basted with safety pin because I wanted to wait until this point to add stars.

I began by practicing drawing some of the five pointed stars we've been drawing since kindergarten or first grade. Then, using a sheet of card stock and a pencil, I placed five dots around an imagined center point and drew a star.  The size you choose for these stars is totally optional.

The next step is to cut around the original star a short distance outside the drawn lines, rounding the starpoints slightly.  (I cut probably about 3/16 inch outside the lines.

Lay the card stock star on the back of a square of white fabric and trace around it.


Cut out the fabric star.

Lay the fabric star right side up on a scrap of thin batting.

Sew around the star on the very edge of the print.  The reason for this step is that if we just appliqued the stars to the blue background, the background would shadow through.

[An alternative approach to this step would be to sew the star, print side down, to the adhesive side of a piece of heavy iron-on interfacing; then trim the star with a 1/4 inch seam allowance, cut a slit in the interfacing, turn the star right side out, iron it into position on the blue, then applique it by machine or by hand.]

I chose to trim the batting close to the star.

I chose to make three of these stars.  It would be equally appropriate to choose another number of stars, perhaps one for each family member. Most often an odd number of stars will be more interesting in the finished project.


 I arranged the three stars on the blue section, pinning them in place. If you've chosen a different number of stars, your arrangement will be different.  I did have to shift or remove some the basing pins.

The next step is to sew-quilt the stars.  I recommend lowering the feed dogs and using a darning/quilting foot.  (If the feed dogs on your machine do not lower, ignore them or set the stitch length at zero.)  Begin stitching on a straight section of the star close to the edge, and go around each star two or three times, moving inward each time.  You could also remove the pin and quilt a little design inside the star.  (I didn't.)

For a fast quilt, just stitch in the ditch of all seams or add some cross-hatching in the star section.

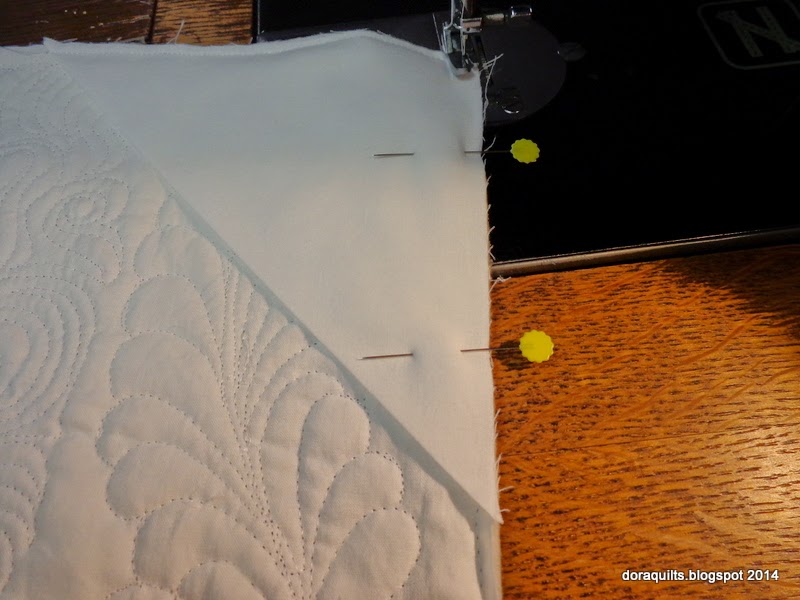
After quilting but before binding, cut two 6.5 inch triangles from white, press them in half diagonally, and align them with the two top corners.  They'll become quick and easy supports for a dowel rod for hanging.

 Add binding, sign your quilt in some way, and the quilt is done.

Of course, I couldn't stop there!  I omitted the ditch stitching and stitched designs all over. (See previous post.)


Here it is in all its quilty goodness adorning our front door.

Here's the dowel rod holding the back.  I already had this 1/8-inch dowel rod, and it was the perfect length, but when I get a chance I'll get a 1/4 inch dowel cut to size.

 Here's the back view with the quilting more visible.
As I was making this, I photographed some additional tips that I'll post later.

Perhaps the best thing about this wall hanging is that with the information in this tutorial, you can make all sort of variations. A Canadian variation would work with all red and white fabric and red maple leaves.  How about a Seashore variation in sand, white, and light blue with starfish or seahorses instead of stars?  A car variation would be great for a little boy.  For a musician or music lover the number of stripes could be reduced to six white and five black; the quilt could be rotated so the black background was on the left, and it could be appliqued with brightly colored notes and a bass or treble clef sign (or a tenor clef sign for a cellist).

I quilted "Liberty" in cursive right in the center of the quilt.  To add to more minimal quilting, after stitching in the ditch, stitch various patriotic words in the stripes.

Or, for a grandparent, print and piece a photograph of family or grandchildren into the top section and quilt names and birth dates into the stripes.

For travelers, print a map in the top section and memorable sites visited in the stripes.

With some borders, it would make a great prayer quilt (I prayed for our nation as I made it)  or a gift for an armed forces veteran.

We're limited only by our imaginations!

Yes, I do have the problem of coming up with many more ideas than I can ever quilt much faster than I can even write a list of them.

If you make this little quilt or some variation, I would love, love, love it if you would share photos with me!

Special thanks to Vincent Van Gogh's Starry Night and Lori Kennedy of The Inbox Jaunt for inspiring the quilting in the star section.

Happy quiltmaking...and knitting.

Have a wonderful holiday weekend.


Related Posts Plugin for WordPress, Blogger...