Showing posts with label Simple Quilt Design. Show all posts

Friday, July 10, 2015

Playful Kittens - A Prayer Quilt

What a happy little prayer quilt! This was made by Pat, I believe, as a result of the piecing workshop we had at the end of May.


I absolutely love the border fabric, and it's pretty evident that I had a lot of fun quilting it!

The pieced borders as well as the other inner borders and the kitty blocks received loopy yarn scrolls inspired by the kittens' yarn.


It was sooooo much fun to quilt that feathers and ribbon border!
After the next quilt dedication service this quilt will be going to someone facing cancer or another serious health challenge.

Happy quiltmaking,

Wednesday, July 8, 2015

Half Square Triangle Quilt

Here is another of Ruth's half square triangle quilts.

Do these make you think of lovely sunny summer days and blue skies?

Very, very light custom quilting....

And a very narrow border blessed with swirling ribbons.
This is another quilt for our church's Victory Prayer Quilt ministry.

Happy quiltmaking,....

Sunday, July 5, 2015

Sweet Summer Dreams Quilt

This is another Victory Prayer Quilt pieced by Pat.
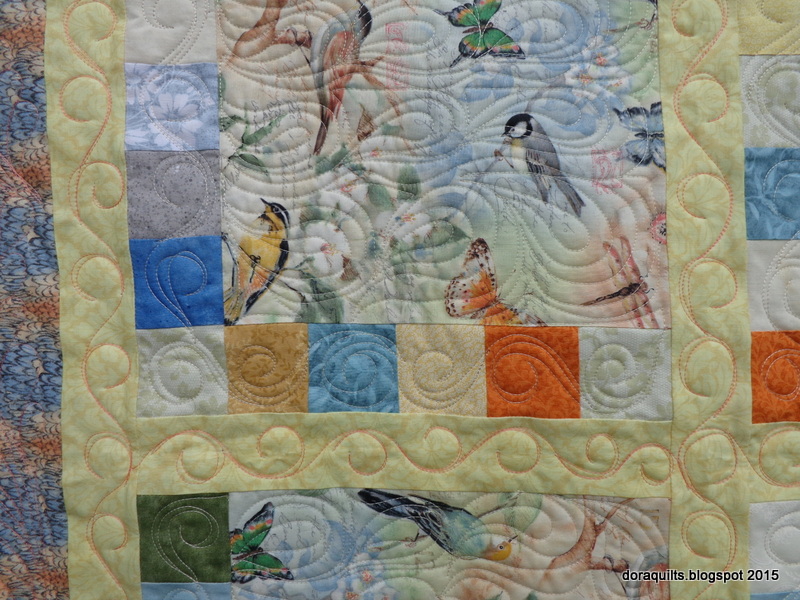
We pieced prayer quilts using this pattern at our May workshop, I believe. I love the bird fabric Pat used.  These colors are so not me, meaning, I would have chosen other colors, so that made this a lot of fun to quilt.

 The border is such a busy print that the quilting is not very distinct, but that's fine.

 The bird blocks were adorned with echoing raindrops.


And this is the reason it doesn't matter that the quilting can barely be seen on the quilt's border:

It's as if this quilt were wrapped in a surprise; the border quilting looks great on the back!
Those dancing stitches, on the entire quilt, not just the borders, and the prayers that went into this quilt yielded a very happy time.  We hope that will be true for the recipient as well.

Happy quiltmaking,

Monday, June 29, 2015

Sweet Buttery Prayer Quilt

I'm not keeping up very well with posting my quilting.  This is a quilt Pat pieced for our Victory Prayer Quilt Ministry.


 I love, love, love this batik the color of winter butter.


It's a very happy quilt and is sure to bless someone.

Happy quiltmaking,.......

Monday, July 7, 2014

Very Simple Little Quilt

One week ago today, I found Pepper Cory's "Peppered Cottons" at Busy Bee Quilt Shop.

I'm planning to make them into a very special quilt and decided to do a simple test quilt.
Here's the tutorial for my little test quilt and information about these luxurious cottons.


The beauty of these cottons is that they are woven with a warp of one color and a weft of a second color.  I do have to say that another beauty is that these are of substantial weight, similar to the older Kona solids (and very unlike the other extremely lightweight shot cottons I ordered).  In fact, these are substantial enough to make clothing, quilted or not. I cut four 6.5 inch squares, two from each of two colors.  On the photo above, you can see the single thread on the upper edge of the green.  The two colors in each fabric are what give each fabric its luminosity.

I pinned one edge of the squares so that when I pieced the four patch, I could have the warp running vertically on one patch and horizontally on the other.  Then I sewed them into a four-patch.

The next step was to cut and piece the borders.  For this I cut two 12.5 inch by 4.5 inch strips from the blue.  I pieced the 12.5 inch strips to opposite sides of the four patch.


Then I pieced two 20.5 inch x 4.5 inch pieces on the remaining opposite sides.
Hopefully, you can see in these close ups at least a hint of the richness of these fabrics.

I consistently pressed each set of seams to the darker side.

In these photos you will see the same fabric photographing in very different ways, yielding very different looking colors. Because these are shot cottons, the camera exaggerates the color differences much more than our eyes do; our brains register them as more similar when we see the fabrics in person.


I have no comprehension of why these fabrics haven't been talked about more in quilting blogs. They are just luscious. They create such glorious quilts that they deserve a lot more notice.

Once the borders were on, I cut a backing and a batting 24 inches by 24 inches. For the backing I used a blue that had arrived in my previous order of "shot cottons" that was definitely not a shot cotton, and was heavier than the others that had arrived in that order. I pin basted it using my Kwik Klip.  (Having used this little tool for close to 15 or 20 years, I'm amazed that at the time I purchased it, I wasn't sure it would be a good investment.  It definitely has been!)

After pin basting,  I stitched around the four patch in the the ditch between it and the blue; then I used a long zigzag stitch to secure the edge of the border.

The binding was made of two 2.25-inch strips of a darker color.  With so many fabrics shrinking to as little as a 40-inch width after laundering, quilters will love that this fabric is still 44 inches wide.
I'm not showing a photo of the color catcher I threw into the washer with these because it came out perfectly white.


I quilted with Fil-Tec Glide thread.  I had sketched and quilted similar designs before, so I didn't mark these on the quilt.  The use of two colors in the feathered border was a first for me, and I don't know if I would do that again.

What I discovered about the colors of quilting thread was that I prefer the appearance of lighter rather than darker threads on this fabric.  Also, I find the appearance of the quilting more pleasing if the color of the quilting thread varies quite a bit from the threads from which the fabric is woven.


I do wonder if the lack of visibility of these fantastic cottons on blogs has something to do with the way they photograph.  However, I'm one of those people who thinks fabrics and fibers are always better when we're close enough to touch them.

I'm going to take this little quilt to Busy Bee in the hopes that it will help them sell more of these fabrics.  When I told one of the owners that studio e is shipping 15 new colors in August, he was almost as excited as I was.  When we talked later, he said they have to order studio e fabric from their Henry Glass representative so that limits how many they will be able to buy since their budget needs to include Henry Glass fabrics too.

This simple little quilt has really helped me develop ideas for the larger quilt for which these fabrics were purchased.  I hope to make a final design decision and get the larger quilt pieced today.

In "desert news," we received this:
and more.  Officially, 3.36 inches since July 3rd.  These were not monsoon rains, so we are still hoping for those.  Although there were severe fireworks restrictions, I doubt that they were enforced after the rain in our little town.  The private aerial shows went on for over three hours; of course when they are shooting so high into the sky, they are visible to everyone.  As of yesterday, the national forests were still closed; I don't know if that means that officials have not had a chance to re-evaluate the closures in light of the rains or if the rains were insufficient to warrant opening them.

Blogger is not working well.  Some readers, but not all, have been unable to leave comments. I'm frequently getting almost blank screens that don't function as I attempt to add photos, labels, and tags, and frequently have to just go back to the post lists to edit.  I'm sorry about that.

You will find links to post of what others are working on at the following blogs:
 Judy Laquidara's Design Wall
Diana at Red Delicious Life
Free Motion Monday
Free Motion by the River
Lizzie Lenard Vintage Sewing
If you're a new visitor here, you will find more feathers in many of my previous posts.

Happy quiltmaking....

Thursday, July 3, 2014

Tutorial: Quick Patriotic Wall hanging

This Patriotic Wall hanging or Door Decoration is very quick to piece--and can be very quick to quilt if the quilter chooses to stitch in the ditch.

Because this is a tutorial, it has many, many pictures and will take a while to load on slow or crowded connections.

Please read all directions thoroughly before beginning this project.


This project was made from 1 fat quarter of blue, two fat quarters of red, and about 5/8 yard of white.

I used Michael Miller's Fairy Frost--mostly because the quilt shop didn't have red, white, and blue batiks.

This project would work equally as well if made from stash fabrics, left over jelly roll strips (although it would still need a fat quarter of the blue), or a variety of scraps.

I also used some scraps of thin white batting behind the raw edge stars, and 32 x 36 inch pieces of white batting (Quilter's Dream Request or Mountain Mist Rose are nice and drapy) and white bleached muslin.  A very low contrast, very light colored backing would work as well.

Cutting:
From 1 red fat quarter cut 2.25 inch strips for binding and put aside.
From the second red fat quarter, cut 7 strips 2.5 inches x 22.5 inches (in other words, from the longest side of the fat quarters)  Does not have to be exact because we'll be trimming the to 20.5 inches.
From white, cut 8 strips, 2.5 inches x 22.5 5 inches (or 4 strips the width of the yardage).
From the blue, cut one 10 1/2 inch X 18 1/2/ inch rectangle and two 2/12 inch rectangles.

Piecing:
Piece three red/white sets of strips.  

Sew a red strip to just one pair so that you have a red/white/red set.  Then piece all sets together so that you have a set of red and white strips with red on each end, for a total of seven alternating stripes in the set. Red/white set of strips should be 26.5 inches wide.  Trim so that the strips are 20.5 inches long (although they may be longer if so desired).

Cut one white strip into two 10.5 inch rectangles and piece each white rectangle to a 2.5 inch blue rectangle.  Stitch each white edge to the 10.5 edge of the large blue rectangle. Check to be sure the new blue/white section measures 10.5 inches x 26.5 inches.


Press all seam allowances away from the white.

Pin the blue/white section to the red/white section, and stitch together.  I found it was easier to keep the red/white section on to of the blue/white sections so I could keep all the seams turned in the correct directions. The only slightly tricky part is that the two outer seams on each side of the blue/white section will not nest--but that's because we want to avoid any shadowing in the white that could be created by nesting seams.


This completes the piecing of the top.  Press top and layer with batting and batting.  I basted with safety pin because I wanted to wait until this point to add stars.

I began by practicing drawing some of the five pointed stars we've been drawing since kindergarten or first grade. Then, using a sheet of card stock and a pencil, I placed five dots around an imagined center point and drew a star.  The size you choose for these stars is totally optional.

The next step is to cut around the original star a short distance outside the drawn lines, rounding the starpoints slightly.  (I cut probably about 3/16 inch outside the lines.

Lay the card stock star on the back of a square of white fabric and trace around it.


Cut out the fabric star.

Lay the fabric star right side up on a scrap of thin batting.

Sew around the star on the very edge of the print.  The reason for this step is that if we just appliqued the stars to the blue background, the background would shadow through.

[An alternative approach to this step would be to sew the star, print side down, to the adhesive side of a piece of heavy iron-on interfacing; then trim the star with a 1/4 inch seam allowance, cut a slit in the interfacing, turn the star right side out, iron it into position on the blue, then applique it by machine or by hand.]

I chose to trim the batting close to the star.

I chose to make three of these stars.  It would be equally appropriate to choose another number of stars, perhaps one for each family member. Most often an odd number of stars will be more interesting in the finished project.


 I arranged the three stars on the blue section, pinning them in place. If you've chosen a different number of stars, your arrangement will be different.  I did have to shift or remove some the basing pins.

The next step is to sew-quilt the stars.  I recommend lowering the feed dogs and using a darning/quilting foot.  (If the feed dogs on your machine do not lower, ignore them or set the stitch length at zero.)  Begin stitching on a straight section of the star close to the edge, and go around each star two or three times, moving inward each time.  You could also remove the pin and quilt a little design inside the star.  (I didn't.)

For a fast quilt, just stitch in the ditch of all seams or add some cross-hatching in the star section.

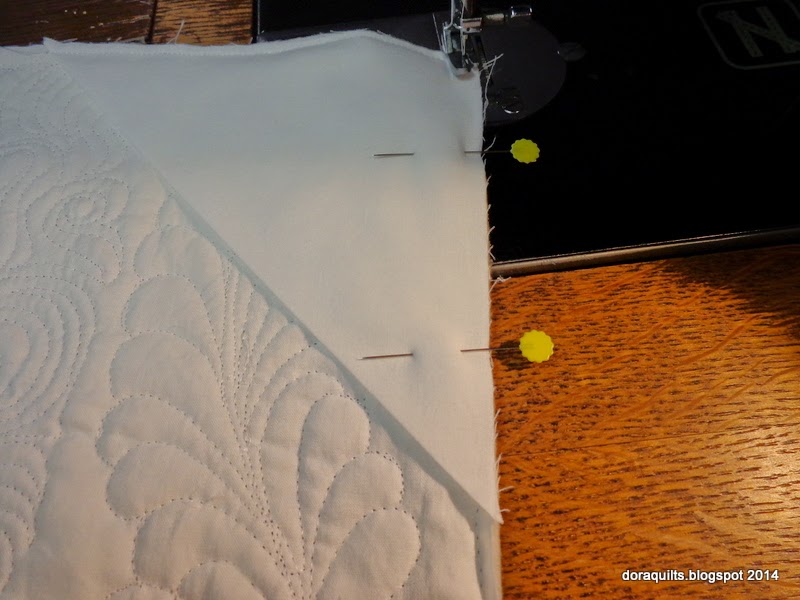
After quilting but before binding, cut two 6.5 inch triangles from white, press them in half diagonally, and align them with the two top corners.  They'll become quick and easy supports for a dowel rod for hanging.

 Add binding, sign your quilt in some way, and the quilt is done.

Of course, I couldn't stop there!  I omitted the ditch stitching and stitched designs all over. (See previous post.)


Here it is in all its quilty goodness adorning our front door.

Here's the dowel rod holding the back.  I already had this 1/8-inch dowel rod, and it was the perfect length, but when I get a chance I'll get a 1/4 inch dowel cut to size.

 Here's the back view with the quilting more visible.
As I was making this, I photographed some additional tips that I'll post later.

Perhaps the best thing about this wall hanging is that with the information in this tutorial, you can make all sort of variations. A Canadian variation would work with all red and white fabric and red maple leaves.  How about a Seashore variation in sand, white, and light blue with starfish or seahorses instead of stars?  A car variation would be great for a little boy.  For a musician or music lover the number of stripes could be reduced to six white and five black; the quilt could be rotated so the black background was on the left, and it could be appliqued with brightly colored notes and a bass or treble clef sign (or a tenor clef sign for a cellist).

I quilted "Liberty" in cursive right in the center of the quilt.  To add to more minimal quilting, after stitching in the ditch, stitch various patriotic words in the stripes.

Or, for a grandparent, print and piece a photograph of family or grandchildren into the top section and quilt names and birth dates into the stripes.

For travelers, print a map in the top section and memorable sites visited in the stripes.

With some borders, it would make a great prayer quilt (I prayed for our nation as I made it)  or a gift for an armed forces veteran.

We're limited only by our imaginations!

Yes, I do have the problem of coming up with many more ideas than I can ever quilt much faster than I can even write a list of them.

If you make this little quilt or some variation, I would love, love, love it if you would share photos with me!

Special thanks to Vincent Van Gogh's Starry Night and Lori Kennedy of The Inbox Jaunt for inspiring the quilting in the star section.

Happy quiltmaking...and knitting.

Have a wonderful holiday weekend.


Related Posts Plugin for WordPress, Blogger...