I receive many questions about Free Motion Quilting (FMQ) on a treadle sewing machine. Truth be told, it's not much different from quilting on any vintage machine or even a top-of-the-line new machine.
The machine does need to be well lubricated/oiled, adjusted so the tension is even [both top and bobbin tension], and even the treadle irons themselves need to be oiled/lubricated. I struggled with an irritating noise in the treadle I'll be demonstrating with today. It turned out that I had not applied enough lubricant to the point where the pitman rod connects with the treadle platform. (I used Tri-flow in a 2 ounce bottle--purchased at a bike shop.) Now the treadle is very quiet. Of course, without a motor and with adequate lubrication, the sewing machine is very quiet too.
I do quilt with a Class 15 sewing machine--not only do I like the action of these machines, I also appreciate that the bobbins hold a lot of thread.
The relevant text will appear just above the correlating picture.
I suggest starting with a new sharp needle. I use these:
I purchase them one to two hundred at a time from
California Thread Supply. Current price is $11.95 per hundred. I've also found success using Schmetz Jeans needles this large or even larger in my machines with tails, although now that I quilt only on treadles the 90/14 sharps work just as well.
(Please be aware that I'm sharing what works best for me, and, certainly, there are other quiltmakers who have different preferences.)
Judy R. pieced this quilt for our Victory Prayer Quilt Ministry and layered it with a fusible batting. So my first steps will be to select thread, zigzag the edges, and do a little bit of stabilizing.
If your machine was last used for sewing thin fabric, you may need to loosen the pressure on the presser bar. On my machines (even the ones I don't use for quilting) there is a little knob/screw on top of the head that allows me to tighten or loosen the pressure. It may well be that the pressure is just fine, but I've seen older machines (and even own one) where the pressure was so high that the feed dogs had marred the presser foot. A too tight presser foot can also cause puckering and differential shift of the quilt layers.
You will probably prefer a fine thread for stabilizing. I love
Fil-Tec's Bobbin Line threads for this step. They are so fine that when I stitch in the ditch, they can barely be seen. (I still use the 90/14 needle.)
Set your zig zag on the widest width you have.
If you have limited treadling experience, you might want to place a couple of pieces of painters tape or stick-on dots or something on the hand wheel so you can easily see out of the corner of your eye that you are treadling in the right direction. Most wheels turn from the top of the wheel to the front when picking up stitches. Most White treadles go the opposite way.
If the wheel is turned in the wrong direction, a stitch will not form--but a lot of thread will be pulled through the machine and will probably break.
Select the darning/quilting foot you want to use. This is the darning foot that came with my Necchi.
Here are a couple other options. If you need to buy a darning foot, you will need to specify whether your machine needs high-shank or low-shank feet. I've bought extra feet and dozens of bobbins that actually work from Cindy Peters in Lake City, MN. She gives great service. Her address is [no spaces] stitches in time [at] earthlink [dot] net
In Canada,
Jenny at Sew-Classic has a similar business.
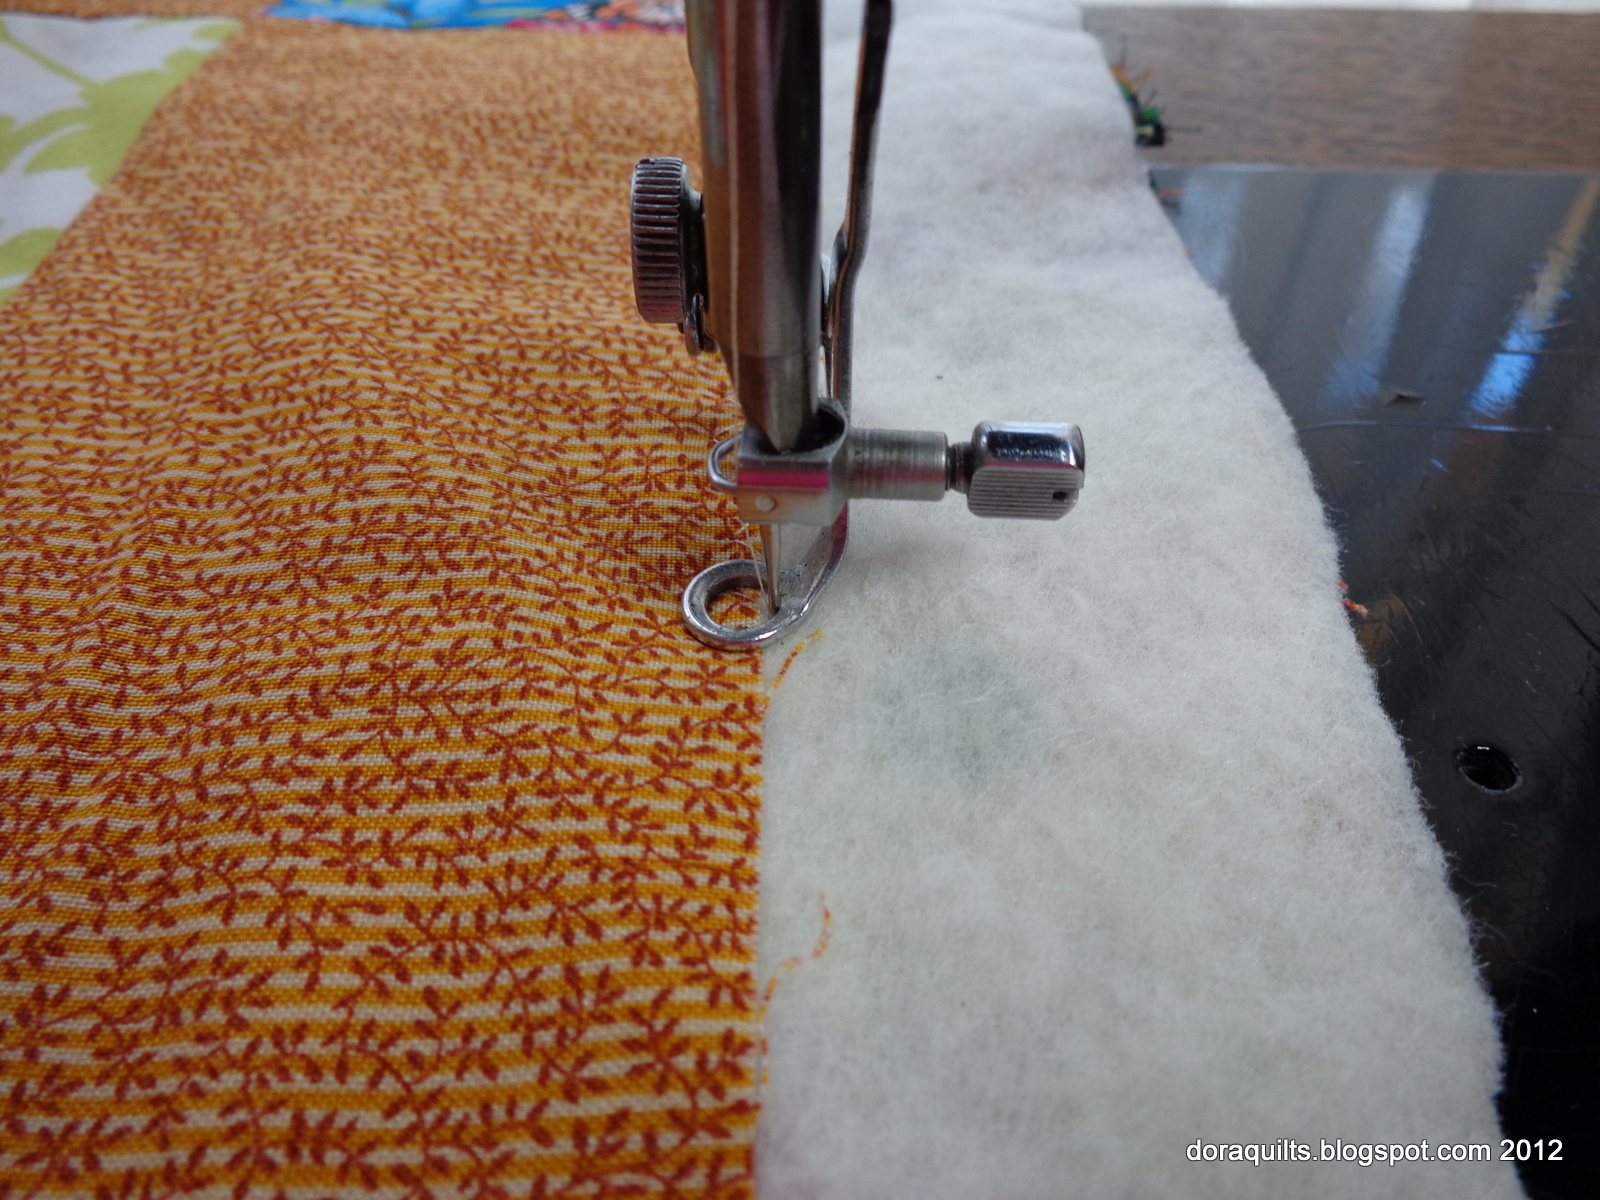
We want to keep our quilts flat as we zig zag around the edges, so remember to drop the feed dogs and use your hands and forearms to move the quilt. If your machine doesn't zigzag, of course you can use a machine with a tail, or just sew a straight line 1/8 inch in from the edge.
When I treadle, I keep my left foot on the platform with my toe at the far edge and my right heel on the floor behind the treadle with the ball (and toe) of my foot on the pedal. (Thanks to Sweet Teen for the photo.) Other treadlers do the opposite. They say their way is more akin to driving a car. Some manage to treadle with both feet on the platform. I think I do it the way I do because I badly sprained my ankle in high school (cast, etc.) so this just seems easier to me. (There's also the fact that the first few vehicles I drove had standard transmissions; think tractors and a 1940's Studebaker pickup truck.)
(Actually, this photo reminds me of our huge feet in photos of my siblings and me sitting on the sofa when we were kids! There was an artist who made tons of illustrations of big footed children back in the 1970's.)
Next step: if you used zigzag, remember to reset the stitch width to zero.
For this stabilizing step, we'll use the same fine thread. That's so the stabilizing will show less. If you don't mind it showing more, just use the thread with which you plan to quilt.
Lots of quilters don't stabilize and their quilts come out just fine. However, if *I* don't stabilize, I find some bump, lump, or twist that I don't like.
Lower the feed dogs. If your machine doesn't do that, just set the stitch length to zero and ignore the tug of the feed dogs against the quilt.
Using your hand, not the treadle, lower the needle into the fabric at the starting point, raise the needle, slide the quilt a short distance from the needle. pull on the top thread, and pull the bobbin thread up to the top of the quilt. Begin with several tiny stitches, then make your stitches a more comfortable length.
The two white squares you see are rectangles of rubberized shelf lining. They work better than quilting gloves for me--cooler and can be moved in a split second. Remember that the stitch length is determined by how far you move the fabric. If you've done other sewing or piecing, just try to flow at the rate at which you are used to sewing. (I do sometimes stabilize with longer stitches than I use for quilting.)
When you reach the end of your line of stabilizing quilting, make several tiny stitches and one larger stitch. Move the quilt several inches toward you and then back toward the presser foot a short distance. Tug on the last stitch, bring the bobbin thread to the top, and cut your threads.
For this quilt I'm using Fil Tec Glide threads. I loaded three class 15 bobbins with
Fil-Tec Glide Pearl, and I'm using a variety of Fil-Tec Glide colors on the top. (For a full size quilt, I may use 7-10 bobbins.) I'm trying to choose colors that will show up enough for you to see the stitches. I looked at these two greens and decided my favorite gold (80137) would show up better for you in this section.
If you choose two different colors and find little dots of the opposite thread appearing, you can usually fix this by adjusting top tension (although I've had machines that were so messed up that I've had to adjust the bobbin tension). If dots appear on the top, decrease the top tension. If they appear on the bottom, increase the top tension. If you can't get rid of the dots, use the same color of thread on top and in the bobbin and mess with the tension come other day.
Again, we take one stitch at the starting point and pull the bobbin thread to the top.
Important!: At
any point during the stitching process, when we stop, we need to be sure
the needle is down. It is so very easy for the quilt to shift just a
bit, yielding an ugly stitch. With a treadle it is very easy to stop
perfectly, but with an electric it's almost as simple to extend our
right hand and stop the wheel when the needle is in the fabric.
I'm beginning with a gentle curve near the left edge of this patch. I'm neither measuring nor marking, just stitching gentle flowing curves.
At the top I do a little scroll and travel back down along the curve, about 1/8th inch to the right of the previous stitching line.
Lots of people would have begun at the top and just stitched a scroll and a single line from top to bottom. Because I've been quilting for decades, I know that the texture I love in old hand quilted quilts was created with double lines for the spines of wreaths and feathers, and sometimes even for the feathers--so more often than not, my spines have two lines of stitching.
At the bottom of the spine, I stitch one teardrop-shaped leaf. To help me visualize that upper curve, I think of all those paper hearts I cut as a child. (When I used to pre-mark quilts and hand quilt, I did use a heart I'd cut from template plastic to draft the feathers.)
Where the top line of the the first feather/leaf meets the spine, I reverse direction and travel up and to the right again--nearly echoing the top line of that first feather.
Near the tip, I curve toward the previous feather (thinking of all those paper hearts again), and then reverse direction and retrace part of the tip. Notice how these feathers are actually kind of flat at the outer tips. Some people use more intense curves, but I find the feathers that are somewhat flattened at the outer edges look better to me. Also, the most pleasing feathers are narrower at the stem than at the tip.
Once I've reached the point where the next feather will begin, I curve upward, to the left, and back to the spine.
Then I travel upward and to the right to form the next feather, retrace the tip, create a new tip for the next feather, and travel back to the spine.
As I near the top of the spine, I make the feathers smaller and smaller (not always, but usually). When my last feather has rejoined the spine with smaller stitches, I take one larger stitch, move the quilt away from the needle several inches and then an inch or so back toward the needle (to give me some ease in the thread from the bobbin),
tug the top thread so the bobbin thread peeks through,
and use my trusty Asian toothpick to pull more of the bobbin thread to the top, and clip the threads. Of course a stiletto would work. I like the way the wood helps grab the thread.
Ready for some fresh spots....
This feather technique means that usually every other feather has a double stitched tip. I hope you find the echo/retrace stitching easier than you anticipated.
Also, please note that because this is free motion, I don't always have perfectly matching stitches, even when that is my intent. (I think I get wrapped up in angles and curves and movement and don't always think about stitch length.) Sudden changes in speed and/or stitch length usually create a tension mess on the back of the quilt that we won't see til later, and frog stitching machine quilting is something most of us probably won't enjoy doing.
Maintaining the same speed and movement is especially important at the tips of the feathers. Lots of us instinctively move faster as we go around a curve. While that may help us maintain control when driving a vehicle, when we're quilting feathers, we need to remain aware of that. While it may not matter if the stitches are a bit bigger at the tip of a feather, if we make a tension mess on the back it will matter a lot.
I decided to use the light yellow green for the other areas on this block.
For this section, I chose to stitch an interpretation of that little pair of leaves and scroll. Mine are just bigger. and I used variations all over this bird print.
When I quilt, I'm not aiming for the kinds of perfectly repetitive designs that might have been traced on the fabric surface. Rather, I just want to keep the same general feelings or impressions about the designs.
Think of it as "God makes millions of strawberries, but they are all slightly different."
Even with the use of the thicker Glide thread, I can stitch in the ditch traveling from one patch to the next and the stitches are barely noticeable.
For the large block from the Sanctuary fabric, I'm just doing a teardrop fill. It starts with a tear drop and then is echoed in lines a bit farther out.
A little bit of some lines may be retraced in order to maneuver into the correct areas.
There we are; one block complete. The new thing for me was quilting those little leaf pairs with the scroll.
Here's the quilt back--even here the white thread blends smoothly.
So, ten minutes or so to quilt the block; a few hours to write, proof, and clarify the tutorial.
If you need to do other sewing, please remember to put the feed dogs back up or to lengthen your stitch if it was set at zero.
Please give this a try. Ask questions. I'll try to answer them and will update this post as needed.
I'm linking to Connie Kresin's
Quilting by the River
and to
Fabric Tuesday at Quilt Story
as well as
Esther's WIPs on Wednesday
and this week's
WIPs Freshly Pieced.
Happy quiltmaking!


25 comments:
I don't have a treadle, but I learned something anyways. Thanks for the lovely tutorial.
Dora, Well done tutorial! I like your method of forming the feathers. Thanks for the tip on using the rubberized shelf lining. I don't like using gloves; so, I'll give this a try. Do you spray baste, pin, or hand baste your quilts? Do you stabilize sections as you go? Or do that all first before the quilting? Thanks!
This quilt has a fusible batting. I don't spray baste because of my personal aversion to the off-gassing that has been part of every spray baste product I've ever used. Most often I hand baste quilts using Sharon Schamber's method shown in a couple of You-Tube videos that a Sweet Onion shared with me.
I stabilize the entire quilt before I begin the pretty stuff. This quilt was stabilized by stitching along two strips of sashing between the blocks both vertically and horizontally.
Thanks for stopping by and leaving a comment.
This is a very helpful tutorial! Thanks!
Your quilt is wonderful. Who knew that an old sewing machine could perform such lovely, neat work. Thank you for taking the time to do a tutorial.
The photos were well worth your time Dora, believe me, I been right where you are with the blogshare taking tons more time than the sewing itself, bu I find this post here so beneficial, I plan to bookmark this one. Thank you for explanation of your stabilizing stitches, of your double spine, the fact that some feathers (not all) will be stitched over, and even your feet placement! Thank you!!
:-}pokey
Goodness, Pokey, thank you for such lovely remarks. I'm hoping this post will keep some of those old machines, even ones much older than mine, from going to the dump or becoming weird sculptures or lawn adornments.
Thanks for this! I'm going to try it tonight!
Who knew??? AMAZING! Makes me wish I had a treadle, but I highly doubt I am coordinated enough to pedal and free motion quilt at the same time! LOL
Wow, you are so informative. You really took time to post this. I think I will share this on my blog this week.
This was so relaxing to read and look at the all the beautiful perfect stitches and feathers you created:) Thanks for the insight!
I want to learn to quilt on my treadle someday -- probably after I learn to piece with it. I got one at an estate sale for ten bucks that's supposedly in working order, I just need a new belt. And to figure out how to thread it and wind the bobbin. Luckily, it came with the original instruction book!
Great tutorial. I can't FMQ on my tailed machine, but, one of these days, I'll try it on one of my treadles. My treadles only do straight stitch, but, that is fine with me.
I do have one question - I tried FMQing on my treadle (a Singer model 27 from 1901) and I noticed there was a lot of drag on the quilt. Do you ever use anything like a Supreme Slider on your machine? I think the safety pins in my quilt are snagging on my cabinet close to where the metal machine bed meets the wood (the cabinet is original to the machine and I haven't refinished it) but I'm not sure.
Dora, the quilting is beautiful. So wish I could be a mouse in the corner watching how you handle the bulk of the quilt as you sew/quilt. That is the most difficult part of machine quilting for me ;)
GORGEOUS WORK DORA!
Smilies
SweetAmbrosia aka Julie
What a wonderful tutorial Dora! One of these days I'm going to get a treadle but for now thanks so much for the excellent photos and steps on making your feathers! I really, really need to get some of that thread too! Thanks for sharing.
Quilting at the River Linky Party Tuesday
This is a fabulous tutorial - the pictures were so helpful and your instructions were completely clear. Thank you! blessings, marlene
I definitely learned something - very nice tute on feathers! And I've always admired your treadle quilting - amazing!! Thanks for linking up to Quilting For Good Tuesdays!!
That was fun to see how to treadle! Sure wish I had a machine like that! Maybe one day...
UAU! DORA it was nice work, congratulations. Have a good weekend.
http://tearpiaocupacional.blogspot.com.br/2012/08/repouso-mas-nem-tanto.html
Great tutorial Dora! And your quilting is awesome! I need lots of practice just to get the treadle going in the right direction and at the same time stitching an even seam. I've a long way to go.
Thank you for sharing. Elly
This is absolutely amazing..totally impressive..you have blown me away:) a very good thing!
I love FMQ on my 1904 singer treadle but I am no where near you in techniques. Enjoyed your tutorial so much, thanks for spending that time making it.
Thank you!! Wonderful tutorial. Love your site.
Un estupendo tutorial. Me gustaría que hablaras un poco de los plásticos que utilizas y no los guantes de acolchar. Gracias.
Post a Comment