Friday, March 27, 2009

Spring Snow


This was our world this morning when we awakened. (We drove through some ugly blowing snow on our way home for praise band practice last night; fortunately, it had not yet begun to stick.) Although Accuweather says we've received only 1.2 inches, they measured it somewhere other than here. When I awoke there were 4 to 5 inches atop my neighbor's wall. At 10:50 a.m. there are still two inches sitting atop the tree branches. When I opened the door to take a picture the tree was full of fluffy birds puffing their feathers for warmth. Some flew away, but others decided to stay right where they were. We've had sun and snow off and on.
We desperately need the moisture; the slow moisture from melting snow benefits us more than rain that just runs off to the low spots. That said, I don't think I'll trek out to our storage building to retrieve spring clothes today. (I did trek out with the garbage bin and got snow in my shoes; we'll see if the garbage truck arrives; nothing seems to stop that huge thing! We have the ruts to prove it!)

On Monday Alex and I met our long-time friend Selma for brunch. She was on a solo get-away through the Four Corners area. Lovely visit. Lovely lady!

Thursday, March 26, 2009

More Split 9-Patch Windmills


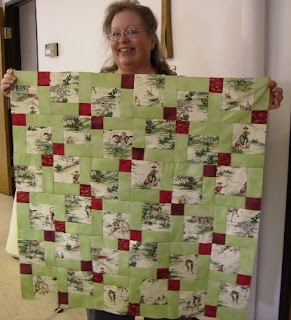
Here's how much I got done at our quilting day for our Victory Quilt group. What a wonderful way to celebrate National Quilting Day!
This is the top after I pieced the border--it kind of needed a little red fence, so it got a fence and four little fenced fields.


Here are Ruth's eyes and the top she pieced. She misunderstood the aba; bcb; aba arrangement for the interior of the nine patch and used only two fabrics, so she has windmills and lovely areas for larger bits of quilting.

And here's a helpful hint for piecing not only this windmill with directional fabrics, but also almost any block pieced in sections that need to stay grouped.


I place each group of cut and pieced patches on a piece of deli paper, put another paper on top, and continue layering patches with deli paper. I can set the completed group in something like a file folder box or a basket to keep them organized as I continue sewing.

This last treat is a Victory Quilts top Ruth completed last fall before her surgery. She added fabrics around a pre-printed panel. I quilted it.

I love this quilt, partly because I would never have purchased the panel and partly because the quilting was such a joy.

You may want to click on the picture to enlarge it so you can see more of the quilting.

I love the way finishing things others have started helps me stretch my skills!

I'm working on some more masculine Victory Quilts and will post them when I get to the point where I can take photos. I should have photographed them yesterday when Pat and Alex helped me pin them for quilting, but I forgot. Sorry about that!

Growing Girl!


Alexandra had a band concert a week ago; since we had several hours between school and the concert, we went to a notoriously slow restaurant. She ate three pancakes, two sausages, two slices of bacon, half a slice of ham, hashbrowns, a few bites of egg, and...a hot fudge sundae!
She couldn't finish the hot fudge sundae. However, after the concert when we were on our way home, she said, "I wish I had the rest of that hot fudge sundae!"
She saw me blogging this and said, "I still wish I had that hot fudge sundae!"
Hmmmmmm......

Sunday, March 22, 2009

Tutorial: Split 9-Patch Windmills - Second Step

5. Piece an ABA strip to each side of each BCB strip, making sure seams match. The fact that your seam allowances go in different directions will help your strips "nest" together for a good junction, usually without having to pin the fabrics at the seams.


Then slice the completed nine-patch blocks vertically and horizontally through the exact center of the block. (I use my 4"X14" or my 12.5"X12.5" Omnigrid ruler to be sure those center rows and columns measure exactly 4 inches wide and deep.)

6. Rearrange the cut blocks like this:


7. Piece three rows of three blocks like this:


8. Add four plain borders like this:


Or, piece the border with corner blocks.


Yesterday most of us pieced ours with five or six inch borders.
There can be countless variations on border treatments, and multiple borders can also work. I like wide borders because I love to quilt feathers in borders (well, frankly, I like lots of feathers everywhere).
9. The last step is to layer, quilt, and bind. (I know, that's at least three steps, quilting is my favorite.)
Instead of piecing nine twelve-inch blocks, you might prefer piecing sixteen nine-inch blocks.
I have made both sizes. I like twelve inch blocks for directional fabrics with larger "illustrations" or motifs--and some day I may use a fabric with even larger designs and cut five and a half inch pieces for fifteen inch blocks.
Happy quilting!

Tutorial: Split 9-Patch Windmills--First Step

Nine patches have been around since quilting started. Windmills have been around almost as long. Although I have many quilt books and quilt encyclopedias, I've not seen the pattern for this finished block in any of them. However, it's possible that someone somewhere sometime has even published a pattern for a Split 9-Patch Windmill. I've never seen this pattern anywhere, although I admit I rarely glance at patterns when I get a chance to visit a quilt shop. (Too busy fondling fabric!)
Because of the questions I've received, and because of the fun my church quilting group had piecing these yesterday, I've written more complete instructions--instructions that will be blogged in two steps because of the number of illustrations.
This is a great pattern for beginners, but it's still fun for people like me who've been quilting for several decades. This is also a great quilt for stashbusting. Every quilt looks different, and when I get the chance I'll post pictures of some my friends and I have pieced.
Begin by selecting three fabrics for the blocks:
Fabric A: a directional print, a theme fabric, a focus fabric, or a medium fabric.
Fabric B: The fabric for the windmill blades; it needs to contrast well with the other fabrics; can be a light fabric.
Fabric C: a dark fabric, although it could be anything that contrasts well with the other two fabrics.
You'll need enough of one fabric to make borders. The border fabric can be one of the three fabrics above or some other coordinating fabric.
If you decide to make a border with corner blocks, you can use one of the fabrics above for the corners, or you can even choose a fourth or fifth fabric.
(When you plan your fabrics, you'll want to plan fabric for binding and backing as well.)
For best results, the fabric needs to be 42 to 45 inches wide. If you choose to use fat quarters or small amounts of other fabrics, you'll need to adjust the numbers of strips accordingly. If you make your borders about five inches wide, the quilt will finish to about 45" X 45", a good size for napping or keeping warm with a book, but a bit large to try to keep out of the wheels of wheelchairs.
From fabric A cut four 4.5 inch wide strips across the width of the fabric.
From fabric B cut four 4.5 inch wide strips across the width of the fabric.
From fabric C cut one 4.5 inch strip across the width of the fabric.
1. Make two ABA strips as shown below. Place strip of fabric A and a strip of fabric B with right sides together. With one-fourth inch seam allowances, sew A to B. Ad a second strip of fabric A on the other side of B. Gently press seam allowances toward the outer fabric strips.
Make a second ABA strip set.
2. The piece a BCB strip and gently press seam allowances toward the center strip.
3. Layer the ABA strips, and cut into four and one-half inch wide columns.
Two strip sets yield 18 columns.
4. Cut the BCB strips into nine 4.5 inch columns.

Sunday, March 15, 2009

Split Nine Patch Windmills

When I first began quilting, I never made the same thing twice. I knew that in my lifetime I would never have time to make all the quilts I wanted to make.
However, sometimes there are patterns that are so much fun to make, the cause the quilt is going to is so worthy, or I'm just trying to use my fabric stash, and then I end up making several quilts with similar piecing.
Such is the case with these Split Nine-Patch Windmills. I'm not sure how visible the windmill blades are in the photo of the finished quilt, but I was using fabric from my stash.--I have sometimes made windmill blades that really, really stand out in the quilt.
This is a prayer-quilt and is a great pattern for directional prints because when the blocks are chopped apart and put back together, they can be arranged so that the direction of the print can be maintained.

The basic nine-patch block is a pattern of
a-b-a
b-c-a
a-b-a
The a's are the directional print, the focus fabric, the fabric you want to see in the biggest pieces.
The b's are the windmill blades (that will be sliced in half). The c's are the smallest squares (they'll be sliced vertically and horizontally to make small squares).
For this quilt I cut four and one-half inch strips of fabric. I've made other quilts with three and one-half inch strips. I used wider strips because I wanted to better show off the directional print.

After piecing nine 9-patch blocks, I carefully cut each vertically and horizonatally through the center column and the center row.

I used my 12-1/2 inch Omnigrid ruler so I could be sure everything was well aligned.
Those splits mean the center c-fabric becomes four small squares.

I turn each of the squares so that they make this configuration.
Then I piece them back together so that I have "windmill blades" in the center of the block.
Then I pieced the nine new, rearranged blocks together, and new windmill blades emerged where the edges are joined.


I added a five and one-half inch border (cut width: 6 inches) with four corner blocks.
My finished top is about 46 inches square. It could be made larger by adding multiple borders.
To enlarge one width of backing fabric, I pieced a horizontal and vertical column of solid blocks and set them into the center of the backing fabric, making the backing big enough for the quilt.
Now I just need to pin and quilt it.
I've stopped using basting spray. Although I loved 505 Spray because it doesn't gum up the sewing machine needle, it off-gasses for a long time. I'm certain that can't be healthy to breathe. Although I wash my quilts before our church blesses them and passes them on to people with cancers and other serious diseases, I'm still concerned that there may be enough residue to make them sicker. Therefore, I'm back to pinning prior to quilting--that pinning is not a fun part of quiltmaking for me. However, until the day I can afford a long-arm quilting machine, I will be pinning.
I do wish I had a working treadle sewing machine so I could continue piecing when I have to unplug my machines due to electrical storms or when the power goes off and I can't use my electric sewing machines.
Hmmmmm.....


Young Musician's Flute Recital

Here's my young musician at her flute recital last Wednesday. She made a couple of teeny-tiny, itty bitty errors and has been practicing diligently so they don't happen again. She'll play the same number for her solo at the Solo and Ensemble Assessment in April.


These pansies and daffodils were in bloom at school last week. However, the altitude at which I work is 2,000 feet below the one where I live. It will be a while before we see these sights here.

This was the view of the Manzano Mountains from school on Thursday. Most of the view was obscured by clouds. Friday afternoon, when the clouds lifted for a brief period, we could see that quite a bit of snow had fallen there. (This is the west face of the mountains. At my house we see the east face of the Manzanos and Sandias.)


Today as we arrived home from church to howling winds, my young musician said, "This is why I don't want to live in New Mexico." I understand what she means, but howling winds are hallmarks of spring and fall here. They can crop up at pretty much any other time of year too.

Sunday, March 8, 2009

Midschooler and Locks of Love


This is the child who went to see Cassie at Lord & Lynn Salon, (10900 Menaul Blvd NE, Albuquerque, 292-1872) on Friday afternoon.

It's taken five years to grow her hair this long, since her last donation to Locks of Love.

She said she wanted, no, needed, a new look. We talked about some of the differences and the need for more effort to maintain a short haircut. She really wanted to do it. She said she thought just above her shoulder would be what she wanted.

Ready for the scissors.......

The salon will send this and similar donation to Locks of Love to create wigs for children who have lost their hair due to cancer treatments.


This is the young woman who left the salon with me. Can you tell how excited she was both with her twelve-inch donation and her new look?

Alas, her mama fears we will now have to fight the guys off with a broom...or something.


After Cassie had cut off the donation, my mid-schooler decided she wanted her hair a little longer than shoulder length.
I was concerned about returning to bangs after spending years growing them out. I think they look great. Cassie showed me how to trim them to keep them looking great.
She showed Alex how to change the part on her hair a little and how to use a flat iron to flip her hair up or under and to get a little height at the crown.


Here's the pansy that survived the winter, and my mid-schooler's transplant, once again deciding to grow. I do hope it will bloom! Pansies are one of my favorite flowers!


And then there are the tulips and daffodils, poking their little tips through the soil.


These are some older survivors returning to life.
And this is the young woman, who planted some more bulbs for us to enjoy.
I love flowering bulbs...and I'm hoping it's really spring. In ABQ there are many, many flowering trees in bloom. The juniper pollen count is quite high, and other trees are budding or blooming. Out here where we live, there are spots where little bits of grass are turning green. And, of course, we too have the high juniper pollen count. But mostly we just have lots of tumbling tumbleweeds.
Here in the Southwest many people wait for the mesquite to bloom as a sign that spring has arrived. The time the mesquite blooms varies quite a bit from year to year, but its bloom is a good marker of when it's safe to plant or transplant delicate young plants. I think we're quite a few weeks from that point.
We hope you're able to rejoice in some signs of spring wherever you are.
Dora, the Quilter, who has had no time to quilt, although I have dreamed of a few!

Monday, March 2, 2009

Happy Birthday, Dr. Seuss!

It's Dr. Seuss's birthday! It's also mine!
Alexandra bought me a dozen beautiful white roses. She also baked me a cake.
It's so nice that she remembered and made the effort. (Some years she has remembered, albeit, not until the end of the day, but this is the first time she's actually made the effort to get me a gift.)

The other surprise was that my dad called to wish me a happy birthday. In my entire life, this is the first time he has remembered my birthday. When I was growing up, it was a family joke that he never remembered anyone's birthday.
He left a message on my machine, so I came home to a nice surprise. Also had a message from my youngest sister.

All in all, I think I've had more "Happy Birthday" wishes today than I've had in years and years.

Thanks, y'all!!!!
Think I'll go have a piece of that devil's food cake!
Related Posts Plugin for WordPress, Blogger...