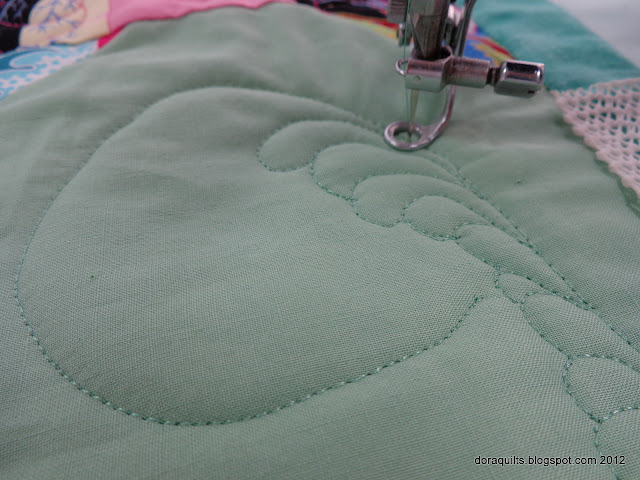
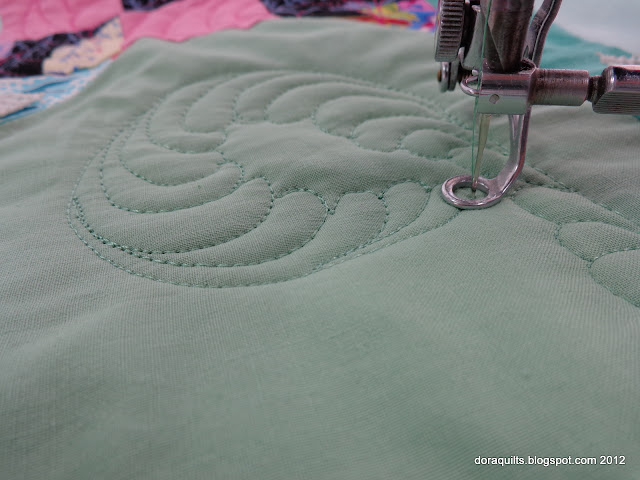
This is a tutorial, so, yes, it is a very picture-heavy post.
The quilt I'm quilting is Little Miss Gardener, which consists of 6-inch nine patches, snowball blocks, and three borders.
I'm quilting on my vintage Necchi BU Nova in 1919 Singer treadle irons. This technique is so generic that it can be accomplished on most domestic sewing machines with or without tails [tails are sometimes called power cords] or longarm quilting machines.
Captions are beneath the relevant photos, because pictures can speak louder than words.....
The plume begins with a circular spine, so we set a spool of Glide in the center of the block....checking from the top to be sure it was more or less centered on the block. We could just as easily have used a round container, cup, glass, but the spools of Glide are so handy.
I used a tracing wheel that I've had since the 1970's to trace around the spool of thread. (Yes, that little arm on the tracing wheel is because back a few decades ago, we always used 5/8" seam allowances on our clothing.)
When I moved the spool away, I could see where to stitch the spine. The marking could just as easily have been done with a Hera Marker or a .05 mm mechanical pen with no lead exposed.
We need to know where to begin and end this plume, so we select the half way point of the circle, and the corner from which the plume will grow.
To make it clearer for you, I marked the half way point with the tracing wheel....
and the diagonal from the corner triangle.
Important!: At any point during the stitching process, when we stop, we need to be sure the needle is down. It is so very easy for the quilt to shift just a bit, yielding an ugly stitch. With a treadle it is very easy to stop perfectly, but with an electric it's almost as simple to extend our right hand and stop the wheel when the needle is in the fabric.
Beginning at the diagonal, we stitch the line around the circle,......
and then, just before we reach the beginning of our stitching line (about an inch away, although it could
easily be a little further), we stitch to the corner of the triangle and
Of course, we could just as easily begin by stitching the right side [outer side] of the feather, but the inner feathers need to be smaller than the outer ones, so I prefer to do the fiddly part first,.....
so I can move on to the more pleasurable part.
We continue around the inner spine with the feathers.....
creating smaller feathers as we reach the tip [top] of the spine.
At the top of the spine, we make an elongated, roundish feather and then travel around the circle in the opposite direction, stitching about 1/8th inch away from that original spine. The 1/8th inch is not set in stone--it just looked good on this feather. If we were quilting a twelve or fifteen inch block, we might want 1/4 inch between the lines of the spine.
We stitch all the way back to the base of the spine.
Then we stitch an elongated teardrop shape--or, as I like to think of it, one half of a narrow, graceful heart.
We stitch a nice curved line until we reach the top of the tear drop,...
retrace the top of the feather,...
and add the top and side of the next feather [above view from the back of the presser foot].
Here's the same point in the stitching viewed from the front of the machine.
We continue on our merry way, adding new feathers, retracing the tip, and stitching a new feather.
I like this part of the stitching because the feathers can be fuller since the curve is not so tight.
We're at our third corner of the block,....
and we continue to the fourth corner,...
and we continue to the fourth side of the block.
At this point our feathers are pretty full,.....
but since we need to rejoin the tip of the plume, we need a much smaller feather.....
and a couple even smaller ones to complete the tip.
We snip our threads.....
and have a look at our very happy little plume.
Easier done than one might suppose.
Jeane says I should be sure to tell you that I do not turn my quilt when I'm stitching these plumes. It may look like it because I used some different angles for the photos, but the orientation of the quilt did not change.
The plumes could just as easily travel in the opposite direction, and on this quilt I have both clockwise and counter-clockwise plumes. You know, I really have trouble getting my feet to go where they need to when I dance, and these little plumes almost convince me that I am dancing!
When you try this, please let me know how it works out for you. If you are not quite ready to try it, you'll find more quilting help on this tutorial. In addition, if you try this and find that some of my instructions lacked clarity, please let me know where the breakdown happens for you so I can attempt to make this clearer and easier.
Oh! Bonus information: Fil-Tec Magna Glide Classics bobbins
If you came here looking for my post for Michelle Foster's Blog Hop Party and Give-Away, click this link. (Give-away closes Wednesday, September 5, 2012.)
I'm linking up to Judy Laquidera's Design Wall Monday, despite the fact that it was the bed of my machine, and not a wall, where this design was created.
I'm also linking up to Elizabeth at Pieceful Life's Little Quilt Monday. If you have a little quilt, from tiny to baby quilt size, I'm sure she'd be glad to have you link up too.
Happy Quiltmaking.....


15 comments:
Well done, Dora ! You did a wonderful job explaining and photographing every single step involved in quilting these beautiful plumes !
And they look ever so much more lovely when done on these solid fabrics where you can really appreciate them.
Very pretty, Dora. I used to try to hand draw feathers on paper, as an exercise for machine quilting them. I can't even draw the feathers, much less quilt them. I'm a 'follow the line' type person. Draw it on, then hand stitch over it. So far, I can't even machine stitch over the line correctly. You do such pretty work.
Wow! That is just gorgeous Dora! You did a great job on the plume and the tutorial! I can't wait to try it :*)
What beautiful quilting! I have a quilt at home that I think I'm going to try your plumes on.
Great tutorial Dora and I am going to try your feather tonight.
Wow...I am so impressed. I will keep this post as new till I am ready to experiment with this. And, if you are waiting to see how it comes out in the wash...you have to wait till November:)
Thank you so much for the tutorial. I'm going to practice a bit on paper before I attempt it on the sewing machine. Your feathers are just beautiful. I'll let you know how it works out!!
What a fantastic post Dora and you really broke it down well on how you did the feathers! I'll have to try this! Thanks for sharing.
Freemotion at the River Linky Party Tuesday
that's an awesome tutorial!! I never thought of using a tracing wheel, but I definitely will now :)
Guess I'll make a tablerunner or something with extra Tn Waltz so I can (finally) quilt some feathers...
You make it look so easy. Directions are great and easy to understand....now if my hands and motion would just cooperate I would be in business. Thanks.
Beautiful Dora. Thank you.
SewCalGal
www.sewcalgal.blogspot.com
Fantastic post, Dora. Thank you for breaking feathers down into steps. I'm going to try your method.
LOVE the idea of using a lead-less pencil for marking and the tracing wheel, too. Great ideas. Thanks you.
Dora - what a terrific post! ou make those feathers look so easy. I will try them.
The idea about using the tracing wheel is inspired. How many of us have this gadget gathering dust. I am surely going to use it the mark with on a quilt. Since it make tiny dents/holes, it should show up better than the plastic dodad thingie. lol.
Smiles,
Julie aka SweetAmbrosia
Great tutorial, Dora! Thanks for alerting me to it. Also, I realize I wasn't following your blog, so I did that. I guess I need to do some practicing--starting with drawing, because I have a hard time visualizing the feather first.
Thanks again!
Post a Comment