Sunday, November 24, 2013

Tutorial: Dolly's Little Basket Blocks

This tutorial is for my grandmother's Little Basket Blocks, which finish to 6 inches. {Several dozen photos ahead.}


Today these are most often referred to as Stamp Baskets, because they appeared as a set of four on a U.S. postage stamp in the late 1970's.  I've seen at least a couple of other variations referred to as Stamp Baskets.  We are making sets of four 6-inch [finished] blocks.  Some on-line friends and I have decided to piece these on our PPMs [People-Powered Machines].  Of course, it is possible to make these on machines with tails [electric machines], but treadling and hand cranking are just soooo much fun--and keeps those marvels of 19th and 20th century engineering and manufacturing doing what they were created to do.

Since I awoke to this this morning,...

it's the perfect time to stay inside, stay warm, sew, take photos, and write.  (Yes, the depth of the snow increased, making me so very happy that I do not have to drive to work! Since my church is 20 miles away, it seemed wise not to attempt that trip either.)

I did begin with a plan and recorded it in my journal:

Please come along and piece with me.  In the comments section below, I'd love to hear from everyone who joins us.


We need to cut these pieces as stated and shown above, plus a blue piece of bias two inches wide and long enough to form a handle with plenty left over. (Please note that the reason the tips of the triangles are missing on some of these triangles is that they were cut from a strip of fabric with a triangle ruler.)


 I'm piecing on a Necchi BU from the early 1950s set into 1919 treadle irons. When I piece on vintage machines for which I do not have a 1/4" foot, I just use a quilting ruler lined up with the needle on the 1/4 inch line, making sure the ruler is parallel to the stitching line and the left end of the machine if it has a rectangular bed, and then scootch multiple pages of a Post-It note pad next to the ruler to guide my fabric.


First, we fold our strip of bias and sew the cut edges together with a 1/8" seam.  Of course, you may choose another width, but if you use a strip that is wider, it may be best to cut it to the shape and size you prefer and applique it in a more traditional way.

I did not press the folded edge because this fabric was just a bit stiff to begin with, and I wanted it to cooperate when I was ready to applique.

2. We fold our 6 inch background triangle in half so that it's "legs" are aligned...


and finger press the center, being careful not to distort the fabric since this is a bias edge. It can be helpful to lightly finger press that outer corner too.


3.  We're going to mark the path for handle placement. I'm using an empty plastic jar (the kind in which I usually store my quilt basting pins).
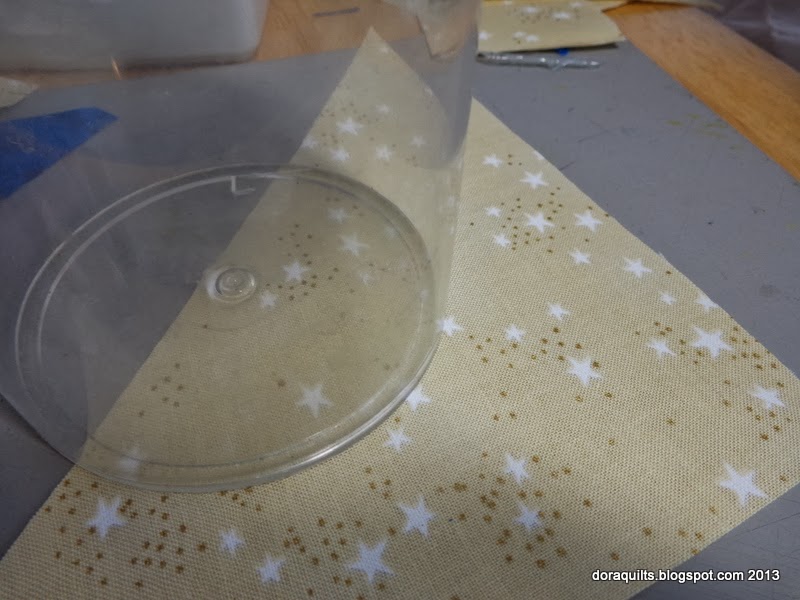
 This particular jar has the added bonus of having a molding mark that I can place on the fold I finger pressed. [The diameter of this jar is 3.25 inches.  I'm not sure how important it is that someone use the same size circle and same width handle.  I'm thinking part of the charm of these blocks will be that each set will have some slight variation in the handles.]


 4.  Mark the jar's circumference.  I used a water erasable blue pen, but a fine lead pencil would work as well.  (The line will be under the bias handle, so it won't be visible.)


5.  Next we place the seamed edges of the bias against the marked line, ease it into a curve, and stitch it down.


 If we stitch just a hair to the left of the previous stitching, no stitches will be visible when we are done.


 We do need to be careful not to distort the background while we are stitching.


7.  We trim off the extra bias strip, leaving a bit of excess at the end.


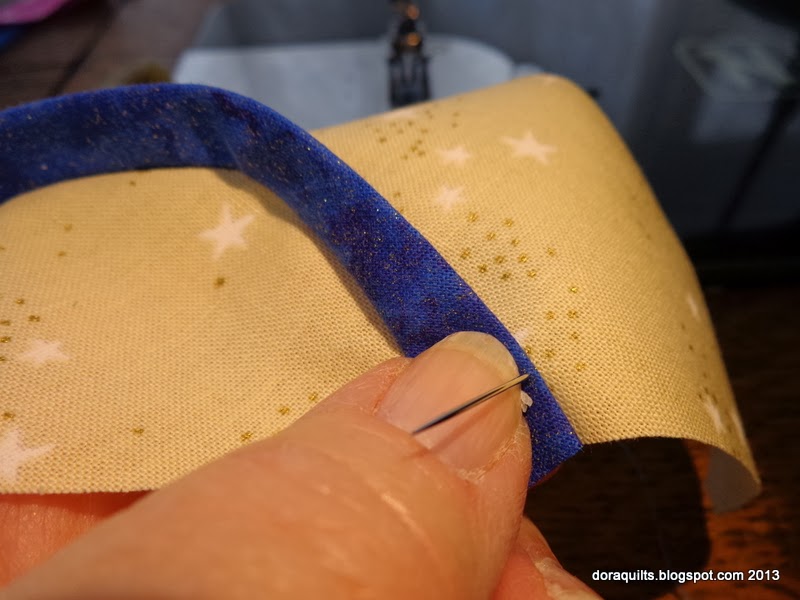
8.  We finger-press the basket handle toward the corner of the block.  Yes, we could use an iron.  [I didn't.] At this point a) we can top-stitch the outer edge of the handle, demonstrating the beautiful, even stitching of our antique and vintage machines; b) we can secure the outer edge with a narrow zig zag if we have a machine with that capability, or a zig zag attachment; or, c) we can hand applique that edge.


 I chose the latter, so I got out my antique silver thimble that a sweet lady in Tennessee gave me when my grandmother'silver thimble disappeared.


 I threaded a size 8 or 9 between [because that's what I had]; some people prefer sharps.  I ran 10-14 inches of thread over a chunk of beeswax.  Hint: most often we try to match our thread to the appliqued piece.  A single ply of high-quality embroidery floss run over beeswax is quite strong and can get us a closer match.  (I used a much lighter thread, hoping to be able to show more detail in the photos.)


 I wrapped the thread around the needle three times [tip of thread facing the eye of the needle], held the "wrappies", and pulled the needle through for a nice sized knot.


 I brought the needle up about 1/2 inch from the triangle edge, through both layers of fabric.


 One of the tricks to nearly invisible applique is to put the needle back into the fabric perpendicular to the spot where it came up through the applique, and then bring it back up through both layers of fabric about 1/8th inch to the left.


 Despite the much lighter colored thread, these stitches are nearly invisible.


 With a little tug after every three stitches or so, they become even less visible.  The trick when tugging is to be careful not to distort the background triangle.


 We continue until the applique is done and knot off on the back (about 1/2 inch from the triangle's edge).


 9. I pressed with steam.  Some people believe steam will distort the fabric and would never use it.  (I was careful.)


 We can see there was very little distortion.  However, there was enough to justify doing the applique on a larger triangle.

10. Our next step is to align the triangle ruler with the bias edge and trim ever so slightly.


If our finger-pressed bias line to the outer corner has disappeared, we can finger press it again.

We want this triangle to finish to a four and one-half inch size, so it needs to be trimmed to five inches (taking care to have the handle centered on the long diagonal side of the triangle).

 11.  Next we layer the appliqued triangle on top of the largest basket triangle.


12.  When we have them perfectly aligned, we take them back to the sewing machine and sew our scant 1/4 inch seam on the longest side.


13.  Once the seam is sewn, we lay the pieces with the basket fabric on top, and finger press the seam open.


 14. We trim off any little dog ears in the seam allowances.


15.  If we have any doubts at all about the accuracy of our seam allowances, this is the time to be sure that this portion of the basket measures exactly five inches square, because it will need to be 4.5 inches square in the finished block.

16. We align our two small triangles with our small back ground rectangles.


and place right sides together.


We seam across the short sides of the rectangles,


trim off dog ears,


 and seam our new shapes to our main basket square, finger pressing as we complete each seam.


After sewing each side to the larger triangle square, we trim more dog ears.


17. We check to be sure we have that nice junction where the two triangles meet the main part of the basket.


18. We lay the remaining background triangle over the basket base.


and seam so that our needle crosses the previous seams where they joined (which is why the blue basket needs to be on top).


19.  We check the junctions of our seams and trim more dog ears.


 21.  We check to be sure our seams match up at the base of the basket

and that our seams along the edges are crossing 1/4 inch from the edge of the patchwork.


22,  If so, we gently press the finished block and check with a quilt ruler to be sure it measures 6.5 inches so that once it's seamed to other blocks, it will measure six inches square.

23. We also need to be sure that where the seams turned toward the lighter fabric, there is no dark shadowing where the edge of the blue seam allowance managed to be wider than the light seam allowance.  If so, we'll trim that extra blue with some sharp little scissors so we can banish that shadow.

For much of the work on these blocks, I used a triangular Omnigrid ruler that I've had for a couple of decades.  I do not know if it is still being marketed; I haven't seen it in stores, but seldom look. I know there are a variety of other businesses that market similar rulers.  Readers who can recommend triangular rulers are welcome to do so, and I will update this post with their recommendations.


Our group has decided we will each make four sets of four blocks to exchange; some of us will make an extra set to give us a finished collection of 20 six inch blocks.


Since these blocks are so small, we're considering a separate more simply pieced signature block with our name, the machine we used, and where we live.  When that decision is made, I'll post how to do that.


The quiltmakers originating this exchange are members of the Treadle-On community; we sometimes call ourselves "Onions," which is short for "Treadleonians," a title that seemed perfect after it originated in a member's misspelling many years ago.


Fellow Treadleonions can find information about this block exchange HERE. (Some of our Onions may wish to use some alternate techniques, which will be fine as long as the completed block measures 6.5 inches square so it can finish to a 6-inch block once it is set together with other blocks.)               


We are using low volume prints as our back ground.  You can find a post about those HERE.


If other individuals or groups, on-line or off, decide to try these, we'd love to hear from them.


I don't have enough of these blocks done to have them on any design wall except the one in my mind; nevertheless, I'm linking to Judy L's Design Wall Linky over at Patchwork Times

If you wish to leave a comment and are unable to do so, you may e-mail me at 4dscheer [dot] quiltmaker [at] gmail.com or use the comment form near the top of this page on the right.  If I receive too many spammy comments, I'll just remove the gadget.

Happy quiltmaking.....

Saturday, November 23, 2013

Low Volume Possibilities for Stamp Basket Blocks

Some on-line friends and I want to exchange "Stamp-Basket" blocks that we'll make on our people-powered machines.  (PPMs = treadle or handcrank sewing machines.)

Here are some considerations for "low-volume" fabrics to use in Stamp-Basket blocks:

 I like prints like this because they consist of cream color printed on a white ground fabric so there is no "paint" to deal with. This fabric is more interesting than a plain white, off-white, or muslin.

 While these may qualify as low-volume, the contrast is just a bit too much.  The fabric in the top center is also a great way to make a piecer crazy.

 These are lovely low-volume prints.


 These might be just a bit too loud (have a greater contrast than is desirable) as basket backgrounds.

 However, when flipped to the wrong side, they could be perfect.

 More whisper-friendly low-volume prints.

 And yet one more whsipering volume print that will work well when it's cut into pieces and is free of paint so that it could accept an inked signature or inscription with no difficulty.

 These prints are still low volume but are better suited to use in over-all low volume quilts than as low volume backgrounds in six-inch blocks although they might work well in larger blocks.


I love these low-volume prints, but they would lose their charm if cut into small pieces.  However, they would work well for alternating plain blocks, sashings, or borders.

Because the low-volume makes these prints hard to see, remember that we can right-click on any photo and open it it a new tab or window to see the photo in a larger size. If it's still not detailed enough, we can use Control+ to make it even bigger.

While there are patterns for Stamp Basket blocks on line, I'm going to post tutorials for this block that are simpler and more accurate here on my blog in the coming weeks.  (For the record, Stamp Baskets didn't get that name until the 1970s when the U. S. Postal service published a stamp with these simple blocks that had been around at least since my grandmother began making them in the early 20th century.)

Happy quiltmaking....,

On and Off the Needles--November 23

I apologize for the absence--I've been having some adventures as well as challenges.
However, the socks are finished!
 This was gift yarn, and I started them a year or two ago.  This is a mixture of patterns.  These were made toe-up beginning with Judy's Magic Cast On.  For variety, the section with increases to the heel was purled instead of knitted--for some nice textural contrast.  When I reached the leg portion, I switched to slightly larger needles (because I have fat legs, and if I don't increase the needle size, I have a hard time guessing how far up my leg the socks will come since when I put them on, they stretch and get much shorter.

When I reached the leg, I discovered that inside each skein of yarn was matching reinforcing yarn that was meant to be used for the toes and heels--but I didn't know that until far too late.  I do like this yarn, despite it's dulled colors, but I certainly didn't want to rip and remake them!

Since we've received our first ice and snow storm, I just wanted them finished so I could wear them!

Here's the progress on the leg warmers for my daughter.  She attends university about 100 miles or so from us, but she's getting their first snow right now.
I've started a new pattern section barely visible at the left side of the knitting, and when I've done enough of that, I'll switch back to a rib. No pattern; just some patterns from other sock patterns or pieces of lace that I've wanted to try. If I can finish these by Thanksgiving, my Sweet Teen can take them back to school.

As I was playing crossing guard after school yesterday, I realized that not only do I want some leg warmers but also that it would be good to have them long enough to go above my knees!  (Yes, it was very windy with a biting snow/sleet mix.)  However, I'm thinking it would probably be wise to look for a wool sweater at the nearest thrift store and do some steeking and creative joining rather than to start from balls of yarn.

I'm linking to Judy's On the Needles.  I can't link to her yarn report because I haven't added any yarn--although I'd like to do so!  Yarn to a knitter is as addictive as fabric is to a quilter, isn't it?  And, of course, I'm both!!

We are expecting more snow in this second storm punch to the Southwest.  Yesterday's gift was a layer of ice covered by snow.  Since the temperature didn't rise above 23 F or so, only a bit of that snow melted [= more ice] and now we have more snow on top of that.  It is very unusual for us to have days with almost no temperature variation.  (A group I'm in planned to go sing at a nearby [10 miles away] assisted living center, but the road conditions led to our cancelling.)

I hope everyone else out there experiencing weather, rather than "climate", is staying warm, dry, and well-fed and watered!  (This weather always makes me glad I don't have farm animals to tend to!)


Happy quiltmaking...and knitting...,

Friday, October 18, 2013

Knitting Progress This Week

In my mind, I spend hours and hours knitting each week.  But this is all the knitting I have to show for this week.  Of course,   I've knit for hours in my dreams.  And I've probably spent too much time on Ravelry.com looking for more ideas for additional sections in Sweet Teen's legwarmers.  I'd like her to have these before it gets too cold--not sure that will happen since it's already dipped into the mid 20's here at night.  Furthermore, yesterday lots of us in my little town scraped a lot of ice off our cars--ice that we expected to arrive as rain or snow.

I accomplished a lot at school this week, and most of us had the opportunity to chat with many, many great parents of great kids.

I also walked into Costco and got a great buy on a new laptop--I'm hoping my old one stays alive until I learn Windows 8  and get a lot of files saved.                                                                                                                       
 Sweet  Teen  is enjoying  Homecoming Weekend at her university. My plans include our Victory Prayer Quilt group   as well as a potluck and Pet Blessing Service. 
Happy quiltmaking...and knitting,...

Sunday, October 13, 2013

Little Bits of Progress

Little bits of progress on the knitting front.
The Meadow Blossom shawl is finished--not blocked, but finished.  The Sweet Latte socks have acquired a few new rows.  And after quite a few gauge swatches, I began a pair of leg warmers for the College Girl. I just cannot settle on one pattern, so they're going to be more like samplers!

I confess that I've spent maybe ten minutes quilting--that's all.  I do look at fabric or a quilt or a sewing machine every time I pass...so that's better than ignoring it all. Our Victory Prayer Quilt group will meet next Saturday.

I've made several trips to and from Socorro, NM.  Last week College Girl went to the Albuquerque Balloon Fiesta with some friends from computer science and asked if I'd mind picking her up from the mall afterwards--so, of course, I agreed.

I had this past Friday off for Fall Break, so she asked me to drive down and get her.  Saturday morning we filled the car with gas and took off for Amarillo and explored the antique shops on Sixth Street.  Of course, we also went to the mall afterward, kind of mandatory with a teenager.  When I asked her what her favorite part of the day was, I expected her to reply with something like, "The gelato at Cowboy Gelato," [where we ate lunch].  Instead, she said, "Just spending time with you."  Aaaaah, she *is* sweet!

We're thinking that we'd like to go back to Amarillo and stay overnight so we could have a couple of days--and visit Canyon antique shops too---although it's very disconcerting to find things from my childhood and early adult life that are valued and sold in antique stores, even if they don't truly meet the standard for vintage and certainly aren't antique.

Today I took her back to NM Tech; it's homecoming week, so I hope she has plenty of fun along with her studying.

I'm in awe of the fact that I've driven close to a thousands miles this weekend--and am grateful for my economical car and the relatively good gas prices.  We did have a lot of fun!

Happy quiltmaking...and knitting, too.....

Saturday, September 28, 2013

Fiber Arts Festival


 Today as well as tomorrow the Heart of New Mexico Fiber Festival is taking place in our little town.
It was cold and somewhat blustery when I ventured over there this morning--although I was told that it was even worse at the park last night.
 There were not a lot of producers and artisans in attendance.  That did make shopping a bit easier, but I do hope the festival grows by leaps and bounds in future years.  (Next weekend is our bit-more-famous Pinto Bean Festival, but the big Taos Wool Festival is next weekend.  And for competition the world famous Albuquerque Balloon Festival opens next weekend too.)  I doubt that I'll be able to go to the Taos Wool Festival, although I'd like to.

First picture featured both skeins of yarn that I purchased.  Second photo was a close-up of the lace weight.
Third picture is a close up of the sock yarn I purchased.  These were spun and dyed by Robin Pascal of Edgewood, NM.

There are quite a few batches of roving, both dyed and undyed, for sale  as well as some lovely yarn (but not sock yarn) from the Mora woolen mill--Tapetes de Lana.  Mora used to be the poorest county in New Mexico; now Torrance County is.  The woolen mill there now has 13 employees and has helped people move from welfare to paying jobs.  I'll try to post more about them later this week.

I hope y'all are getting to quilt or knit or something equally creative!  (Our jugband--we have only one jug, really--played and sang for a wedding this afternoon.  Fun!)

Happy quiltmaking,.....

Sunday, September 22, 2013

Quilting, Patchwork, Knitting, etc.

First I want to let you all know that although my little town received so much rain that we still have some puddles, to my knowledge there is no lingering damage from flash floods.  We do have a lot more green stuff growing than we've had in years--although technically we are still in a drought.

 This is the first quilting that has happened in ages--and I managed that only because yesterday was the monthly meeting of our prayer quilt ministry, Victory Quilters.  This is a wonderful star quilt pieced by Judy; however, it's going to be a while before I can show you the rest of it. I was gifted a Necchi BF (straight stitch) sewing machine that I took to the church; it was nice not to have to lug a sewing machine along when I went there yesterday.

 I just tossed it over one of my treadles so that I also could show you one of the wonderful lights from Ikea that my young friend Kim Larkin picked up in Dallas and mailed to me.  I've wanted one for years, but Ikea doesn't ship them.  They are available on Amazon for about three prices.  I'm thinking those of you who do live within shopping distance of an Ikea store might want to pick some up as gifts for your relatives or quilting/crafting friends who would have to drive hundreds of miles to get to a store.  The lamps have a heavy solid base and are very easy to assemble with nothing more than a screwdriver.  (I sent one to NM Tech for my daughter.)

The respiratory virus/infection that has had me down for three weeks or so did not prevent me from making some other acquisitions.

 Dillard's is selling these Southern Living Christmas Cookbooks for $10.  In Albuquerque the funds go to Ronald McDonald House; I'm not sure if that is true in all markets, but these would also make good gifts.

 I've acquired this purplee lace weight yarn thinking it will make a nice scarf or shawl.


 These are the socks I've been working on.  I started the toes months ago but couldn't decide on a pattern. This pattern was called an eyelit rib--it's free on Ravelry, but I just searched and couldn't find it.  In any case, it was a top down sock that I'm doing toe up.

 I've started this sweater with some of Auracana Chilean hand-dyed yarn rather than the Cascade in the directions. Download Here. (Yes, I easily spend hours and hours on Ravelry--to the detriment of blog reading.)

 These are a few of the wonderful Bow Tie blocks I received in the recent Treadle On Block Exchange. The block on the left was made by an educator in Gallup; Gallup was the first place I lived in New Mexico 25 years ago!  I haven't yet met her in person--but I'm thinking I should!


This is the 3S Shawl showing the first picots I have made in knitting. (I've made more than a few thousand in tatting!)  It's not yet blocked; I just tossed it over the back of the loveseat so I'd have a photo.   I thought it would be larger, but I had only 100 grams of yarn.  It will be plenty big enough to wear as a neck accessory or in the collar of a coat.  (I have another on the needles in a dusty pinkish red color which will be quite a bit larger.)

I've been keeping very, very busy; you know I've been just trying to ward off loneliness with Sweet Teen away at college.  I can see that I could end up being very, very busy but not enjoying things if I don't give some more thought and editing to my activities.  I would love to start a little needlework/handwork group of four to six people who could meet in my home one evening every couple of weeks.  I'm not sure I know enough people to make that happen.

I did get home Friday evening and miss Sweet Teen--but Netflix had arrived so I got to re-watch Tuck Everlasting as well as another film that's not worth recommending. The truth is that I just love the music in that film--and the Edwardian dresses. I'm coming home from school really exhausted--and am looking forward to another special ed teacher coming on board soon so that I can have a reasonable sized caseload instead of about twice as many students as I should have.

I'm really missing my blog reading--I get so spoiled over the summer.  I even have magazines I haven't had time to read!

Happy quiltmaking.....
Related Posts Plugin for WordPress, Blogger...