Wednesday, July 20, 2011

Tutorial: Bow Tie Blocks

I've loved Bow Tie Block quilts since I was a tiny child.  In fact, in the 80's and early 90's I made quite a few.  There are so many different ways to set them and, thus, dozens of different quilts that can be made using them.  Because in those days my only computer was at work and because we had barely begun to think of things like personal digital cameras, I have no photos to post of those early quilts.  However, at the end of this post I'll share some of those early blocks that were template-cut and hand-pieced.

These instructions are for a "modern" version that can be rotary cut. These blocks are fast to cut and piece and are just as delightful in batiks and other fabrics with more modern designs.  We are so fortunate to have the countless lines of fabric from more manufacturers than we ever dreamed of decades ago.

For the purposes of this tutorial, the photos that accompany each step are shown below the text for that step.

For demonstration purposes, we'll make a six-inch block.  I've made quilts with every size block from three inches to nine inches.
 Remember that you can right-click on any photo in the blog and open it in a new tab or new window to see the photo in a larger size and more detail.

If you are making blocks for the Treadle On Bow Tie Block Exchange, you will be following these directions to make the blocks (6-inch in finished quilt, 6.5 inches when you send them to the hostess).

For one block, select two contrasting fabrics, one for background, one for the bow tie.

Cut two 3.5 inch squares from each fabric, and from the bow tie fabric cut two 2-inch squares.

Mark a diagonal line across the back of the 2-inch squares.

Align each small square with a corner of a background square.

Stitch on the diagonal line.  Because we aim for accuracy, it helps to stitch on the edge of the drawn line closest to the needle or outer corner of the small square.  This gives us the well-known "scant 1/4-inch seam allowance" that aids in our accuracy since thread and stitches do take up a miniscule amount of space in the block.

Press the seams  to set the seams and make the next step more accurate.

Then bring the inner corner of the small square toward the outer corner and press so it is right side up. We know our seam was accurate if the cut edges of all three layers of fabric align at this point.

If you are participating in the TOBE Bow Tie exchange headed by Cheryl Pinkerton due 9/3/13, at this point you will need to trim off the two bottom layers under the print, leaving a 1/4-inch seam allowance.  Then press these little blocks again. 


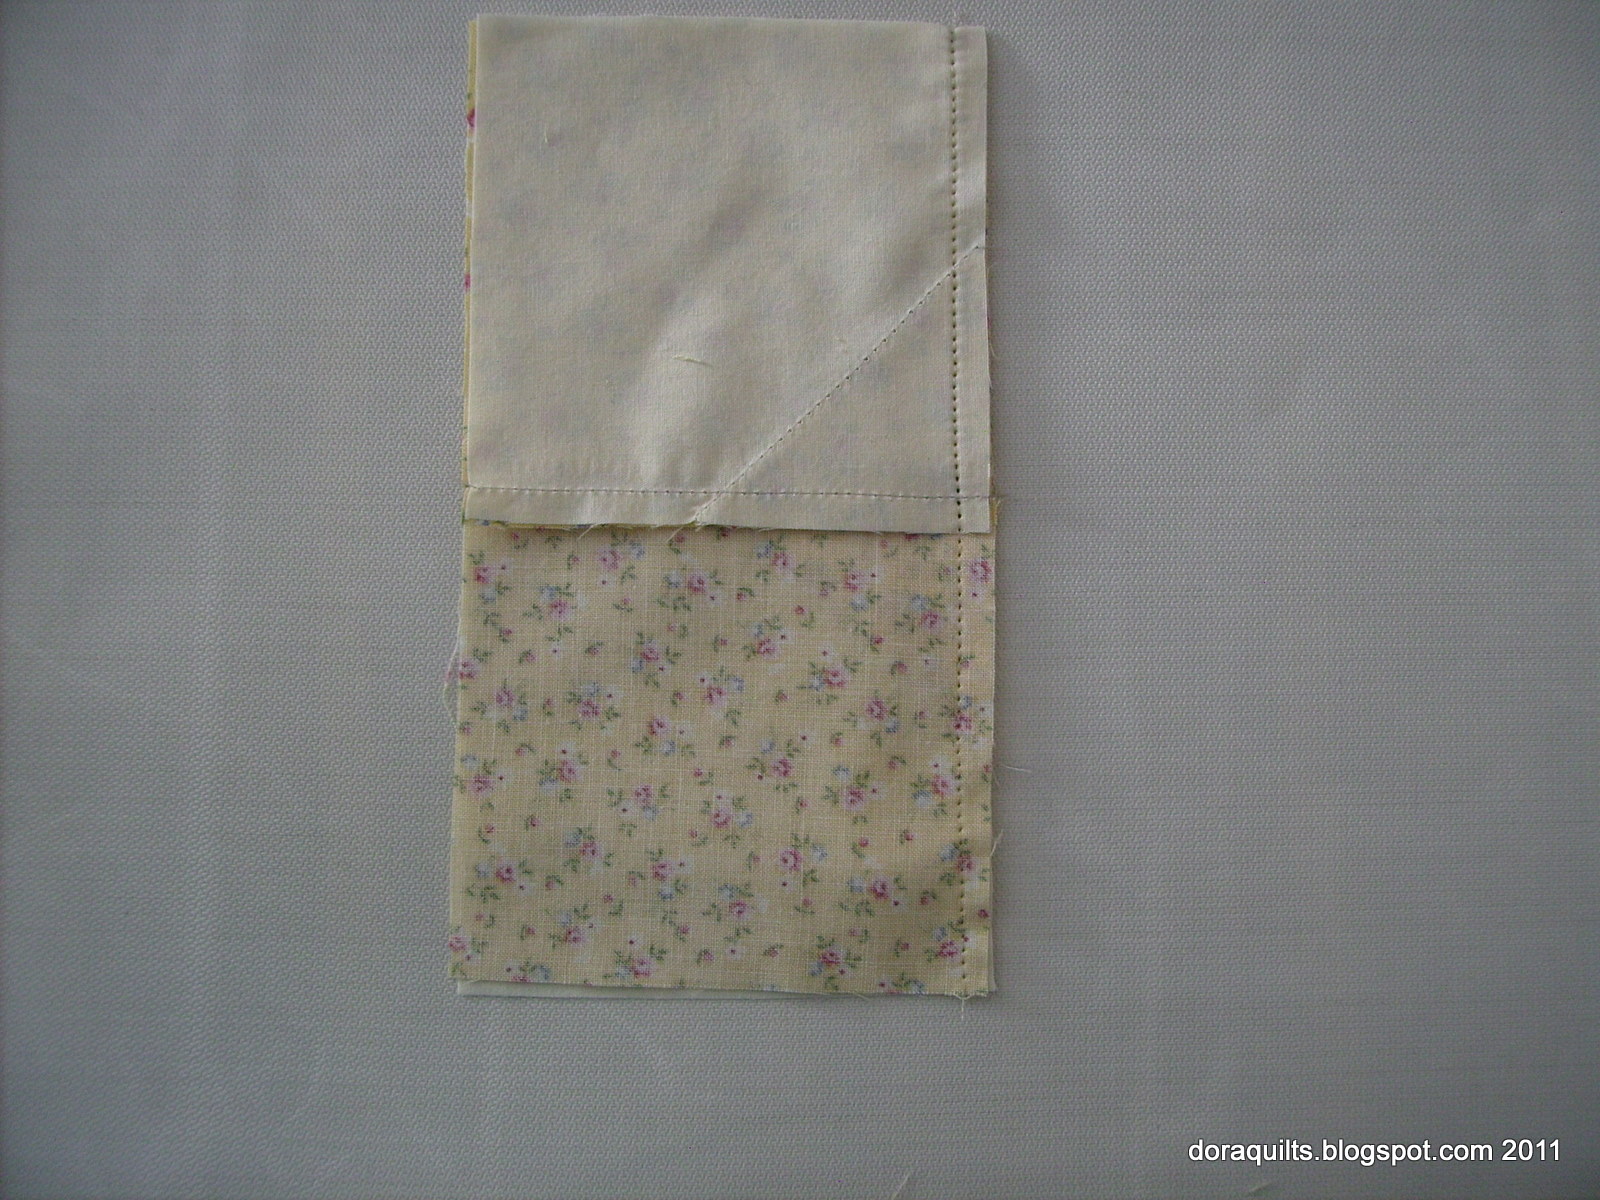
Lay each pieced patch on your table so that the new triangle is at the upper right corner.  Lay the print square above it.

Fold the pieced squares up, aligning them with the print patches.

Seam them together. Press the seams while closed to set them.
With the print square on top, open the seam and press it.  This keeps the pressed seam allowance turned toward the print. This works well if the bowtie is darker than the background.  If we were using a background that was darker than the bowties, we would press the seam toward the background.

Lay the half blocks on the table aligning them as they will look in the completed block.

Align the seams of each half-block so that they butt up against each other.  This helps us achieve a perfect match when they are seamed together.

Sew them together and press to set to set the seam.

Before pressing the seam open, I clip the seam allowance with very sharp small scissors right where those two seams come together. Then when I press the block, I can turn the seams toward the print.

 All the extra care we took at each step, helps us have well-aligned seam junctions in the completed block.


Traditional Pieced Bow Tie Blocks from Past Decades
The traditional way to piece these blocks was with four uneven trapezoids and a small square to represent the knot.
 Because these pieces resulted in set-in corners, it was almost always easier to hand-piece these blocks. However, if the blocks were much larger, I did machine stitch them, just being careful not to stitch into the seam allowances.

For that traditional method, I pieced a bow to opposite sides of the square, being certain to start and stop my stitching at the seam allowances.  Then I pieced in the two background pieces. In this old block, the lines I drew around the templates are visible, as are the points at which I stopped and stitched a little anchoring stitch or tied a knot where the seams abutted and then continued stitching to the next intersection.

As you might surmise, the traditional method was a lot fussier.  When I quilt the modern version, I use lines of quilting to box in the center "knot", so the final look is very similar to the traditional look.

Here are a few more examples of those 1980's blocks now gathered together with other orphan-blocks and pieced into a sampler quilt for my daughter.
Quiltmakers used many different settings for these blocks, and some even used much smaller center squares.  I find this proportion with a center knot half the measurement of the longer sides of the bows most pleasing, so that is what I've used most often. (It's what my grandma used back in the early 20th century too.)
To save you from having to do the math, here are some oft-used block sizes and the  sizes to cut the squares for the "modern" version. We cut four larger squares (two for tie, two for background) and two smaller squares (for tie) for each block.  If repeating fabrics in a quilt, we can start with strips cut to these sizes and then sub-cut them into squares.  (Saves a lot more time.)

Nine inch block: 5 inch and 2.75 inch
Eight inch block: 4.5 inch and 2.5 inch
Seven inch block: 4 inch and 2.25 inch
Six inch block: 3.5 inch and 2 inch
Five inch block: 3 inch and 1.75 inch
Four inch block: 2.5 inch and 1.5 inch
Three inch block: 2 inch and 1.25 inch

Back in the 1990's I made three inch blocks using this modern method (for a quilt for Lydia Devereaux when she was not yet born).  It would have been much too fussy to do the traditional method, but this modern method made it a cinch--and gave me plenty of time to focus on my favorite part, the quilting....Wait, when it comes to bow tie quilts, every step is my favorite part.

If you try these, I'd love to see pictures!

Here is a picture of one of my early bow tie quilts (from the 1980s--complete with fabrics that did not retain their colors because the fabric companies insisted 20 hours of light fastness was more than enough).


Happy quiltmaking......

P.S.:  I just learned that Baby Bows is featured in the July/Aug 2011 issue of McCall's Quilting.  For the traditional pattern in a three inch block, the pattern be downloaded as a .pdf here: http://www.mccallsquilting.com/content_downloads/Baby_Bows_Web_Bonus.pdf
These would make a great carry-along project.  (In fact, that's how I completed many, back in the 80's.)

P. P.  S.: 7/21/2011 I came across the first bow tie quilt I made back in the 80's - 4 inch blocks- and was going to photograph it and add it to this post.  Instead, we had a thunderstorm--that means lightning and thunder and very little moisture--and the power went off, etc.  But I just happened to come across three other "modern" Bow Tie's.  Here are links to other people's blogposts:
http://www.redpepperquilts.com/2011/07/bow-tie-quilt.html
http://fussycut.blogspot.com/2011/05/finished-habitat-bowtie-quilt.html
http://twinfibers.blogspot.com/2011/07/vanilla-blooms-quilt-top.html

Enjoy......

Monday, July 18, 2011

Arrowhead for Harriet

My dear friend Harriet asked me if I would piece this block so we could compare results.

This is from a quilt by Anita Grossman Solomon (website: www.makeitsimpler.com) and appeared in the November/December 2010 Quiltmaker Magazine.

I began with 9 inch squares that I pressed right sides together with spray starch.  Actually, I began with Mary Ellen's Best Press, which I dearly love, but I knew I'd need heavier starching to control the bias edges in the finished block, so I got out the heavy duty spray starch (must remember to get more next time I'm out).  Once the fabrics were aligned and heavily starched, I trimmed the unit to 8" x 8". I followed the directions in the magazine for sewing the blocks together, subcutting them with specific measurements, and piecing the units back together.  Once resewn, the block looked like this:
 You can see that at this point the areas with the triangles did not extend as far as the rest of the block.
 The instructions say to trim the block to 9 x 9 (for a finished block of 8.5 inches).  There were only tiny slivers to trim from the triangle areas.  Had I not been really careful to make an accurate 1/4" seam, I could have been in trouble.
Here's the trimmed block.

I love the clever way Anita devised for making this block so quickly.  She's very creative.

From my experience I'd say it's extremely important to be nearly perfectly accurate with cuts, seam allowances, and trimming.  Ironing the seam allowances open is very helpful for aligning seams (and is something I don't normally do).
I think heavy starch will prove invaluable when it's time to set the blocks together since all the edges are bias. (It's possible I could have kept applying Best Press, but at $7.95 for a little bottle, I tend to use in conservatively.)
People who can handle all the above well will find this block incredibly fast to make.  I'm guessing it would take more time to choose and cut the original 9" blocks than it would to sew them.  In other words, piecing these blocks could be a great project to squeeze little bits of time or a day of marathon sewing.
If a group of quiltmakers were very consistent in their piecing, it would be fun to get together and make blocks like these for prayer quilts.

I'm going to mail this block to Harriet so she can use it if she'd like. I'd be interested in hearing from other people who've tried it to see if their impressions were the same as mine.

Happy quilting....

Saturday, July 16, 2011

Music Quilt

Pieced over the course of the last year.
This one is a music quilt for my daughter.
Still needs the binding, however.


With perhaps one exception, this was quilted with a variety of Glide threads. See at  BobbinCentral.com
I love the shine these threads give the quilting, and as we all know, the quilting is my favorite part.
I am so very glad to have another quilt to show!  (And, I'm linking to Sarah's Whoop!  Whoop! and Sew Many Ways/Sew Darn Crafty.)

Tuesday, June 28, 2011

A Quilt at Last!

I finally have a quilt!  My friend Bobbie pieced this a couple of years ago.  It is now complete except for the binding, which she will apply.
I learned a lot of important lessons, in case I ever decide to either make or quilt another log cabin--things such as measure every piece and cut it accurately.  Eschew the various and sundry donated fabrics, even from well intentioned friends.  Spraying starch over the entire quilt top before layering might have helped manage some of the friendly waves.  But it's done, and it is beautiful.


And then there's the sweet stuff, the assorted relatives. (So, how come just *my* legs look like they belong to a cartoon character!)

For what it's worth, I dearly miss having a nearly constant, convenient access to the Internet.

Saturday, June 4, 2011

The Good, the Bad, the Ugly--and a Quilt

In reverse order:
"What mountains?"

Smoke from the huge, sad Arizona fires has nearly hidden our mountains.  We attended a concert in Albuquerque last night and walked out into choking smoke that had severely limited visibility and breathing.  Scary.  The smoke was kept low by the inversion, so I was able to sleep with our windows open (for which I am grateful).  But for the last week our sunshine has been severely diluted by the smoke.

More ugly:
A yard invaded by tumbleweeds.


The bad--slowly being transformed to good:


A week in pictures of our front yard tree.
And today:
Great progress, although quite a bit to go yet.
The good:

A few bluebells, at last.  (I've learned these *must* be deadheaded.  I'd be quite happy if I had a lot more in my yard!

More good:

Replaced the wreath above the fireplace with some summery giants.
Sweet Teen is thrilled to have her academic letter.
Yes, we ordered the very, very expensive jacket!
And I got a border on the music quilt (a project from last summer), got the backing pieced, and quilt layered and basted for quilting.  Changed the border a bit from my earlier plan.
Also managed to layer and baste the violet star quilt for my nephew.

I'm nearly overwhelmed with things that need to be done (and quickly), but know it's going to be hard to fit them in next week with 80 or more miles per day for Sweet Teen's music and drama "camp". The price of gas means I'm going to have to stay there while she participates because 160 miles per day will be unmanageable.--Maybe I can catch some morning "girl time" with friends who are out of school too--of course, I can also take along knitting or other handwork, and hope the smoke clears out so we can all breathe safely.

Happy quiltmaking!

Monday, May 30, 2011

Sunday Fun

Our church youth group had an outing yesterday.

 Sweet Teen said she had a great time!

Blogging as well as nearly everything except the necessities of day to day living and coping went by the wayside as the school year wound down. I have two days of ABA training this week, a long commute but shorter than the commute to school was, and will then be able to concentrate on summer and do some relaxing.

I accomplished very little this weekend--de-stressing, I guess. I'm hoping to re-engage in some creativity really soon.

Wednesday, April 27, 2011

Big Business That Doesn't "Get It"

I was surprised last weekend to have a notice (aka advertisement) pop up on my Face Book page indicating that Pottery Barn is now selling vintage sewing machines for decorative purposes.
In near disbelief, I followed the link and ended up here: http://www.potterybarn.com/products/found-sewing-maching/popup/more-views.html
They claim the machines were manufactured in Europe from the 1920s to 40s. In addition to German-made Singer, they have Durkopp, Phoenix, Victoric, Gritzner, and Kohler--although the buyer doesn't get to choose.

Pottery Barn is selling them for $199 each.

I contacted Pottery Barn and pointed out that...
Even if this machine were inoperable, it usually takes very little to
make them work. Even without a motor, they can be treadled--and with
minimal care they'll last longer and work as well or better than any of
the "new" sewing machines on the market.
Seems more than a bit crazy to me!

Pottery Barn replied:
Thank you for contacting Pottery Barn.

We apologize for any inconvenience.  Pottery Barn does not sell sewing machines.  Please provide more information regarding your inquiry,so we may assist you.


If we may be of any further assistance, please contact us via email.  Alternately, you may contact our Customer Service Department directly at 1-800-922-9934 from 5:00 am to 9:00 pm (PST), seven days a week.

Kind regards,

I replied by sending them the link and saying it certainly looked like it was for sale.

They wrote me back and said:


Thank you for contacting Pottery Barn.


We apologize for any confusion.  These sewing machines are meant for decorative purposes only. 


If we may be of any further assistance, please contact us via email.  Alternately, you may contact our Customer Service Department directly at 1-800-922-9934 from 5:00 am to 9:00 pm (PST), seven days a week.

Kind regards,

So, I wrote them again:

That is exactly the point!  You've taken machines that could easily be repaired so that they will sew for another 40 to 100 years (much longer than any currently available "modern" plastic wonders will sew) and have created overpriced "decorative" items!

They replied:

Thank you for contacting Pottery Barn.  We regret to learn of your disappointment that we are selling sewing machines from the 1920's to 1940's for decorative purposes.  While we do not know for sure, we suspect these were determined to no longer be functional and have been successfully repurposed.

However, we appreciate your feedback and will forward it to our Buyers for their future buying decisions. 


If we may be of any further assistance, please contact us via email.  Alternately, you may contact our Customer Service Department directly at 1-800-922-9934 from 5:00 am to 9:00 pm (PST), seven days a week.

Kind regards,


Okay, they don't get it.  Here's what I get:

I do believe in using vintage sewing machines.  I love their engineering, and mechanics, and the fact that with a little attention (aka oil) they're willing to work well decade after decade, often for well over a century. It breaks my heart that these are being sold at inflated prices for some rich person to have around for "cute" when there are so many people in the world who would be thrilled to have them to use.

Sadly, I also get that a few resources and the will to make a profit mean that some very usable machines will be merely "decorative." 
 

Saturday, April 9, 2011

Whoop, Whoop or Little Whoop?

This quilt is for a very special young man, and I've been struggling with it for a long time!  The young man has been dealing with a rare form of muscular dystrophy since he was just a little guy.  He's also dealing with depression and some heart problems--they often accompany the MD.  His mom suggested purple, black, and white.

The feathered star is one I hand-pieced about 20 years ago, drawing around each little plastic template.  I showed this in a previous post with a lot of violets that I'd pieced around it.  Today I finished piecing the Lincoln's Platform blocks and put the rest of the top together.  I think the top is done now, but could change my mind.  If I had more of the black on white clock and gauges print,  I'd probably add a white and violet border on the right and bottom, but I've used all but a few tiny scraps of that fabric, so I can't do that.

It was a good day for sewing since we had loud, roaring winds all day. I turned on the stereo, but even it didn't drown out the howling winds.  We know we are surrounded by mountains, but they were obscured by the dust today.  Some of our good friends headed out for a week in Alabama a couple of days ago, and I really wish we could have gone along with them!

I'm linking to Sara's blog. If you visit her post, you can also visit some other people who accomplished lovely things this week.

Saturday, March 26, 2011

Minimal Accomplishments

Not much accomplished in the way of quilting or knitting.

Finished the St. Patrick's Day socks one night this week, started some springy pink ones (which would be a lot farther along if I had spent less time looking at patterns), and am *still* in the process of stabilizing "Fowl Play."
Too bad I have to spend so many hours a day commuting to and from work--for that matter, it's too bad I have to spend so many hours working in order to have enough money to buy insurance and scrape by.  On the other hand, it's nice to know that I'm working at something that makes life better for kids and families.
Sunshine, lovely sunshine here, accompanied by spring winds, of course!
Oh, I'm linking up to Sara's blog, although I almost feel guilty for doing so.

Thursday, March 17, 2011

Green?....

Top o' the mornin' to ya!


Back during the wicked weather of January and early February, I began these so I'd have something green and special to wear for St. Patrick's day.  I'm thinking it's likely that too much time was spent while I watched a few movies with my hands were pausing.  Anyway, they're not quite long enough, so I can't wear them today.  (I'm wearing a Kelly green knit top instead.) 
And for my green activity, I'll be working on some quilts using one of my people-powered sewing machines (PPM).  That counts as green, right?

I thought I might have lunch at my outdoor table since we're supposed to have the warmest day we've had thus far this year.  But we also have high winds and regional fire danger, so I'll have to be content with eating inside, since I wouldn't want my lunch to blow to the next county! Here's our current wind/fire danger map, courtesy of www.weatherbug.com
I'm taking comfort in the fact that it's still yellow and not red--which is what we'll see later this afternoon.

Have a fun St. Paddy's Day.

Monday, March 14, 2011

Pressing Matters.....

I spent literally hours pressing quilt tops and backs today.  Tomorrow I plan to layer and baste them for treadle quilting.
I thought I had a backing for the one shown, but I don't, so it won't be one of the ones that gets basted tomorrow.
This quilt top was made by my mom's aunt, Bessie Hyatt of Ozawkie and Dennison, Kansas,  It has a few pieces of fabric scraps from my clothing and that of my mom, and a couple of pieces from my sister's clothing scraps. I think I recognize fabric from a couple of shirts Mom made for my dad and brother.  Aunt Bess and Uncle Ralph had no children, but they did have five nephews and nine nieces.  Most of the nieces sewed their children's clothing and saved their fabric scraps for Aunt Bess. Of all of Aunt Bess's quilts and quilt tops, I think this has the fewest of our scraps.  The latest scraps I can identify are from when I was in upper elementary school. As far as I know, I'm the only grandchild who became a quiltmaker. 
Aunt Bess refused to give me a quilt because I didn't get married. (Shame on me!)  One time when we were visiting her in Dennison in the mid 1980's, I begged her to at least let me have a quilt top. She finally brought out two or three, and I chose this one.  The irony is that once I had it home and looked it over, I realized it just wasn't worthy of weeks or months of hand quilting.  As I was growing up in Central Illinois, Aunt Bess was my inspiration to become a quiltmaker, something I dreamed about from the time I was two and a half.  By the time I realized that her skills were mediocre at best, I had made several quilts. Aunt Bess made quilts for 60 or 70 years, and her skills never improved.  Isn't that sad? I folded it and put it in a box, thinking it was unlikely ever to become a quilt.

Back in the 80's I repaired a quilt top in the French Bouquet pattern that she'd given Aunt Louise and added borders in a fabric that was the closest I could come to a reproduction fabric.
 Instead of the nine-patch block, Aunt Bess had pieced tiny eight-pointed stars with one inch sides.  She probably got the pattern from the Kansas City Star, Capper's Weekly, or another farm paper.
She had given it to my Aunt Louise when she got married around 1945. After I repaired the fraying stars and added the borders, Aunt Louise eventually had it quilted by some ladies near Wichita.

However, memories of those endless hours of piecing to repair Aunt Louise's quilt failed to inspire me to take on my own quilt top from Aunt Bess.  I'd almost forgotten about that quilt until I pulled out the Tulip Top that I quilted for my niece. Then I realized that although it wasn't worthy of hand quilting, I could certainly machine quilt it.

Like many of Aunt Bess's quilts, this one had a plain white sheeting border.  The corners are blocks made from fabric in a green, white, and orange stripe that my mother made for me in sixth grade; I'm sure she thought it would help me not look so fat.  The interesting thing is that one of the corner blocks is pieced from three strips of that fabric.

At one time I thought I'd add a print border, but the top is so big already, that I'm not going to add another border.  I'll bind it in a 30's print, or several different prints.  However, it won't be one of the ones I layer tomorrow because I'm too tired after all those hours of ironing to search for fabrics and piece and prepare a batting.

I have the happy opportunity to have brunch with a dear friend (the recipient of the Soleil d'Hiver quilt) tomorrow, and then will go to the church to layer and baste the quilts.  For those who wondered, Mary was surprised and thrilled with the quilt.....

Saturday, March 12, 2011

Color Issue Resolution, etc.

Hand pieced feathered star--each piece traced around a piece of template plastic--over 20 years old.  What to put with it?  It's so old that I don't have red-purply fabrics to put with it.  My sister-in-law said one of my nephews who has dealt with some pretty serious health issues since he was a toddler would love a prayer quilt in purple, gray, and white.  I've been trying to come up with one for over a year.  Of course, the additional challenge is that I didn't want to fill it with lots of "flowerdy" prints (Southern expression).  I finally just rounded up a bunch of violet/purple fabrics knowing I would have to follow the plan that enough variety in fabrics can make any combination work.  So, I reached this point last weekend, but too late to post for Sara's Whoop!  Whoop! celebration--I'll link up this week.
And then I'll go work on the next step.
My hope is that over the next week I'll get several quilts layered for quilting.
Our one week "spring break" got off to a delayed start when I realized I'd left some papers I'd need inside my classroom.  Went back to get them and as soon as I'd closed the car door, I realized I had my school keys in my hand but had locked the car keys in the car!  Thanks to help from another teacher and a fairly local locksmith, my departure was delayed by only a little less than an hour.  It's been eight years since my keys have been locked in my car--by a seven year old daughter who endured years of my saying, "Keep the keys in your hand or your pocket."  She's not-so-secretly thrilled that she feels entitled to spend the next few years saying the same thing to me!  The one bright spot, aside from how quickly the locksmith arrived, is that it cost a few dollars less than it did eight years ago.  Still cost a hunk of money, however.
My plan was to put all thoughts of school behind me for a few days, but I barely slept last night for thinking about it!  I mustn't let it mar my few days away.
The signs of spring apparent where I live are high winds and fire danger.  I'm hoping that over the next week we'll also see some signs of spring flowers emerging.  Those always brighten my outlook!

Sunday, February 27, 2011

Finished: Le Soleil d'Hiver

 It's finished, including binding.
My original plan was to quilt a curvy feather that included not only the blue solid but also the two adjacent borders.  But when I tried that, it was immediately clear that the feather wouldn't even be recognized if it extended into those borders, so I ripped it out and placed them just in the blue.
 It was clear that the narrow borders of the blue china were so busy that no quilting would show up, so I just quilted a kind of pussy-willow design in those borders.  (Do people still grow pussy willows?  I loved them when I was growing up.  And if they still grow them, have they renamed them something else?)
Here's another quick look at the seashell quilting....
 and at the ribbons & feathers on a Michael Miller Fairy Frost star.
 In order to see the details, you may have to right click on the next triangle and open it in a new tab.
I used a sunshine yellow on most of the quilt, but a blue for the feather in the blue border.  I used white thread in the bobbin, and it turned out pretty well, that is, very little show-through of the top thread on the back. Then I cut the binding from the same blue as the border.
Finished just in time for another winter storm to move in.  I wanted to take it to church to give my friend this morning, but I hadn't finished tacking down some of the binding on the back.  (Have another idea for binding on the next one.)
Whoop! Whoop!  Sarah's challenge is helping me stay focused on finishing a little bit each week rather than being frustrated that I don't get more done. I'm also linking up with Karen at Sew Many Ways. (Or I will, if I can get Mr. Linky to cooperate!)
Happy quilting......May you find a lot of sunshine in this long, long winter.
Related Posts Plugin for WordPress, Blogger...