This tutorial is for my grandmother's Little Basket Blocks, which finish to 6 inches. {Several dozen photos ahead.}
Today these are most often referred to as Stamp Baskets, because they appeared as a set of four on a U.S. postage stamp in the late 1970's. I've seen at least a couple of other variations referred to as Stamp Baskets. We are making sets of four 6-inch [finished] blocks. Some on-line friends and I have decided to piece these on our PPMs [People-Powered Machines]. Of course, it is possible to make these on machines with tails [electric machines], but treadling and hand cranking are just soooo much fun--and keeps those marvels of 19th and 20th century engineering and manufacturing doing what they were created to do.
Since I awoke to this this morning,...
it's the perfect time to stay inside, stay warm, sew, take photos, and write. (Yes, the depth of the snow increased, making me so very happy that I do not have to drive to work! Since my church is 20 miles away, it seemed wise not to attempt that trip either.)
I did begin with a plan and recorded it in my journal:
Please come along and piece with me. In the comments section below, I'd love to hear from everyone who joins us.
We need to cut these pieces as stated and shown above, plus a blue piece of bias two inches wide and long enough to form a handle with plenty left over. (Please note that the reason the tips of the triangles are missing on some of these triangles is that they were cut from a strip of fabric with a triangle ruler.)
I'm piecing on a Necchi BU from the early 1950s set into 1919 treadle irons. When I piece on vintage machines for which I do not have a 1/4" foot, I just use a quilting ruler lined up with the needle on the 1/4 inch line, making sure the ruler is parallel to the stitching line and the left end of the machine if it has a rectangular bed, and then scootch multiple pages of a Post-It note pad next to the ruler to guide my fabric.
First, we fold our strip of bias and sew the cut edges together with a 1/8" seam. Of course, you may choose another width, but if you use a strip that is wider, it may be best to cut it to the shape and size you prefer and applique it in a more traditional way.
I did not press the folded edge because this fabric was just a bit stiff to begin with, and I wanted it to cooperate when I was ready to applique.
2. We fold our 6 inch background triangle in half so that it's "legs" are aligned...
and finger press the center, being careful not to distort the fabric since this is a bias edge. It can be helpful to lightly finger press that outer corner too.
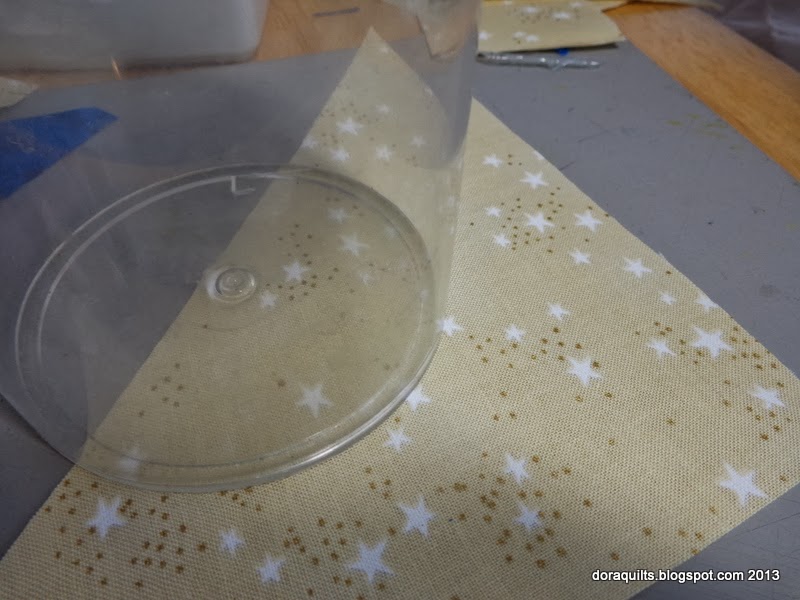
3. We're going to mark the path for handle placement. I'm using an empty plastic jar (the kind in which I usually store my quilt basting pins).
This particular jar has the added bonus of having a molding mark that I can place on the fold I finger pressed. [The diameter of this jar is 3.25 inches. I'm not sure how important it is that someone use the same size circle and same width handle. I'm thinking part of the charm of these blocks will be that each set will have some slight variation in the handles.]
4. Mark the jar's circumference. I used a water erasable blue pen, but a fine lead pencil would work as well. (The line will be under the bias handle, so it won't be visible.)
5. Next we place the seamed edges of the bias against the marked line, ease it into a curve, and stitch it down.
If we stitch just a hair to the left of the previous stitching, no stitches will be visible when we are done.
We do need to be careful not to distort the background while we are stitching.
7. We trim off the extra bias strip, leaving a bit of excess at the end.
8. We finger-press the basket handle toward the corner of the block. Yes, we could use an iron. [I didn't.] At this point a) we can top-stitch the outer edge of the handle, demonstrating the beautiful, even stitching of our antique and vintage machines; b) we can secure the outer edge with a narrow zig zag if we have a machine with that capability, or a zig zag attachment; or, c) we can hand applique that edge.
I chose the latter, so I got out my antique silver thimble that a sweet lady in Tennessee gave me when my grandmother'silver thimble disappeared.
I threaded a size 8 or 9 between [because that's what I had]; some people prefer sharps. I ran 10-14 inches of thread over a chunk of beeswax. Hint: most often we try to match our thread to the appliqued piece. A single ply of high-quality embroidery floss run over beeswax is quite strong and can get us a closer match. (I used a much lighter thread, hoping to be able to show more detail in the photos.)
I wrapped the thread around the needle three times [tip of thread facing the eye of the needle], held the "wrappies", and pulled the needle through for a nice sized knot.
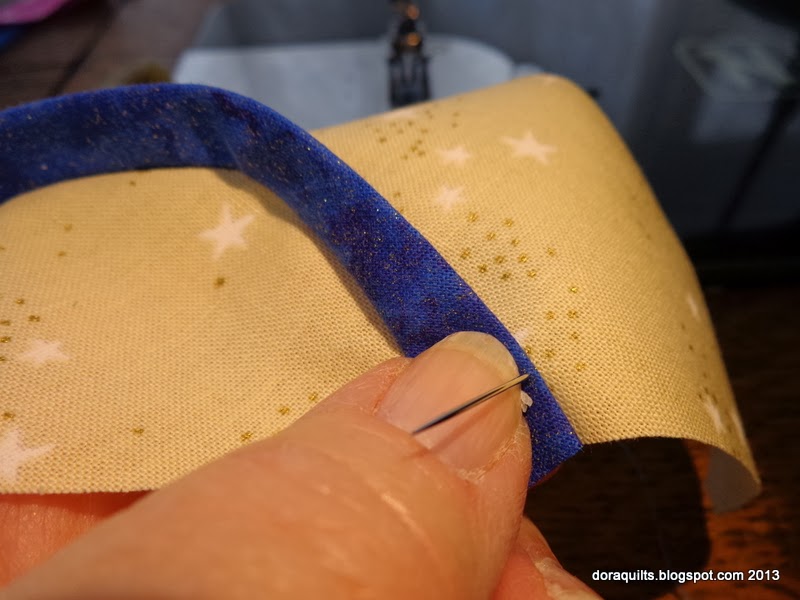
I brought the needle up about 1/2 inch from the triangle edge, through both layers of fabric.
One of the tricks to nearly invisible applique is to put the needle back into the fabric perpendicular to the spot where it came up through the applique, and then bring it back up through both layers of fabric about 1/8th inch to the left.
Despite the much lighter colored thread, these stitches are nearly invisible.
With a little tug after every three stitches or so, they become even less visible. The trick when tugging is to be careful not to distort the background triangle.
We continue until the applique is done and knot off on the back (about 1/2 inch from the triangle's edge).
9. I pressed with steam. Some people believe steam will distort the fabric and would never use it. (I was careful.)
We can see there was very little distortion. However, there was enough to justify doing the applique on a larger triangle.
10. Our next step is to align the triangle ruler with the bias edge and trim ever so slightly.
If our finger-pressed bias line to the outer corner has disappeared, we can finger press it again.
We want this triangle to finish to a four and one-half inch size, so it needs to be trimmed to five inches (taking care to have the handle centered on the long diagonal side of the triangle).
11. Next we layer the appliqued triangle on top of the largest basket triangle.
12. When we have them perfectly aligned, we take them back to the sewing machine and sew our scant 1/4 inch seam on the longest side.
13. Once the seam is sewn, we lay the pieces with the basket fabric on top, and finger press the seam open.
14. We trim off any little dog ears in the seam allowances.
15. If we have any doubts at all about the accuracy of our seam allowances, this is the time to be sure that this portion of the basket measures exactly five inches square, because it will need to be 4.5 inches square in the finished block.
16. We align our two small triangles with our small back ground rectangles.
and place right sides together.
We seam across the short sides of the rectangles,
trim off dog ears,
and seam our new shapes to our main basket square, finger pressing as we complete each seam.
After sewing each side to the larger triangle square, we trim more dog ears.
17. We check to be sure we have that nice junction where the two triangles meet the main part of the basket.
18. We lay the remaining background triangle over the basket base.
and seam so that our needle crosses the previous seams where they joined (which is why the blue basket needs to be on top).
19. We check the junctions of our seams and trim more dog ears.
21. We check to be sure our seams match up at the base of the basket
and that our seams along the edges are crossing 1/4 inch from the edge of the patchwork.
22, If so, we gently press the finished block and check with a quilt ruler to be sure it measures 6.5 inches so that once it's seamed to other blocks, it will measure six inches square.
23. We also need to be sure that where the seams turned toward the lighter fabric, there is no dark shadowing where the edge of the blue seam allowance managed to be wider than the light seam allowance. If so, we'll trim that extra blue with some sharp little scissors so we can banish that shadow.
For much of the work on these blocks, I used a triangular Omnigrid ruler that I've had for a couple of decades. I do not know if it is still being marketed; I haven't seen it in stores, but seldom look. I know there are a variety of other businesses that market similar rulers. Readers who can recommend triangular rulers are welcome to do so, and I will update this post with their recommendations.
Our group has decided we will each make four sets of four blocks to exchange; some of us will make an extra set to give us a finished collection of 20 six inch blocks.
Since these blocks are so small, we're considering a separate more simply pieced signature block with our name, the machine we used, and where we live. When that decision is made, I'll post how to do that.

The quiltmakers originating this exchange are members of the Treadle-On community; we sometimes call ourselves "Onions," which is short for "Treadleonians," a title that seemed perfect after it originated in a member's misspelling many years ago.
Fellow Treadleonions can find information about this block exchange HERE. (Some of our Onions may wish to use some alternate techniques, which will be fine as long as the completed block measures 6.5 inches square so it can finish to a 6-inch block once it is set together with other blocks.)
We are using low volume prints as our back ground. You can find a post about those HERE.
If other individuals or groups, on-line or off, decide to try these, we'd love to hear from them.
I don't have enough of these blocks done to have them on any design wall except the one in my mind; nevertheless, I'm linking to Judy L's Design Wall Linky over at Patchwork Times.
If you wish to leave a comment and are unable to do so, you may e-mail me at 4dscheer [dot] quiltmaker [at] gmail.com or use the comment form near the top of this page on the right. If I receive too many spammy comments, I'll just remove the gadget.
Happy quiltmaking.....