Monday, November 28, 2016

Plan for J. I. Case Quilt

A couple of weeks ago I received a phone call from one of my brothers.  I couldn't take the call, and the transcription was totally bizarre, but I now know that in addition to COPD, he has emphysema.  He and his wife live in South Carolina, and I think I've seen him only two or three times in the last 25+ years.  He's spent much of his life as a big rig driver, and the last time I saw him was when he had a load from California that took him through here on I-40.  Most of his driving was much farther east.  Once he retired, he taught driving for some trucking companies and schools.  At this point, he's digging water wells.

Despite the fact that he's been smoking for at least 45 years, or maybe because of that, I think he should have a prayer quilt. I have a J. I. Case/International Harvester panel that reminds me of a shop/lumber/supply business that we used to patronize in Gridley, Illinois--back when we were the farmer's kids.

He was driving a tractor by the time he was seven or eight years old--and would have been happy to be a farmer all his life if Dad hadn't sold the farm.  After all, his name, George, means farmer.  Fortunately, he also loves driving big rigs, and that was a good career for him.

 As luck would have it, these are not my usual colors, so I had to go shopping.  Kokapelli Quilts/Southwest Decoratives just off I-25 and Paseo del Norte in Albuquerque had a well-timed $2.00 fat quarter sale.  (I discovered last summer that I have almost no real reds.)

Ann Silva's Bernina had some lovely grays, which I chose because our soil was rich, black loam, but my aging eyes didn't want to contend with a lot of black.  I just might tease him that these were the colors we found in his ears at the end of each day on the farm.

This is my starting plan; the plain blocks are approximately where the colors are in the panel.
These patchwork blocks and their placement may very well change, and I may substitute some other blocks.  At least I now have a plan, although not much time to execute it.  I really hope that when I retire, I'll have boundless energy, and many, many years for quilting.  For this quilt, however, I'm figuring a much tighter timeline.  Three weeks until winter break.

Happy quilting, knitting, sewing, and crafting,

Sunday, November 27, 2016

Which Flying Geese Method Is Faster?

Because I decided to add flying geese to the fishing panel, I was curious about which of my usual three methods was faster.
I did not try the "four at a time" method, because I didn't think I wanted four of each fabric.

I have Eleanor Burns Flying Geese 3x6/1.5x3 ruler, so I tried that method.  Here are the steps in photos:
 Eleanor's method is extremely accurate and starts with two squares of different sizes.

 Stitching 1/4" on each side of the drawn pencil line.

 Cutting on the pencil line.

 To my small homemade pressing board, which is why there are lavender stripes.

 Pressing seams toward the background fabric.


 Laying them edge to edge and drawing diagonal pencil line.

 Pin and sew 1/4" on each side of line.

 Cut on pencil line.

 Note space between flying geese.

 Align ruler with flying goose and trim.

 Do the same for other goose.  The rotating mat was quite helpful.

The other method I tried was to cut goose fabric into rectangles and background fabric into squares.
 Strips of background.
 Sub-cut strips into squares.

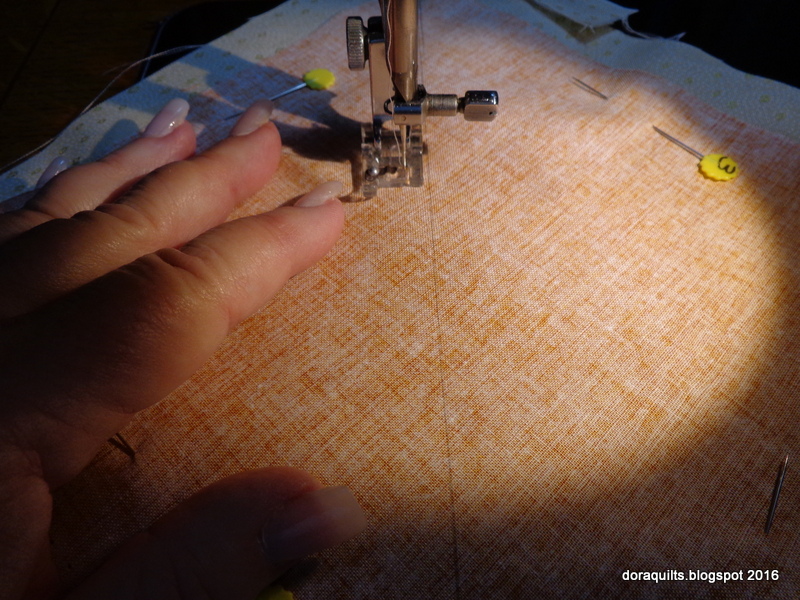
 Align tape with needle.  Ruler helps be sure the tape is perfectly aligned.  (My Jansjo light from Ikea is reflected in the ruler.  Sorry about that, but it gives me a chance to mention how much I love using those lamps; much better than the lights on most sewing machines; of course, there are no lights on my treadles.)

 Place background square on goose rectangle and sew diagonally across square.

 Keep corner of square aligned with the edge of the tape.

 Oops!  Be sure to insert sewing machine needle in the correct place and do not try to just chain feed without lifting presser foot.


 Ripping/frog stitching tip.  Place the red ball of the seam ripper on the underneath side and keep the longer tip on the top of the fabric.  Much faster to rip, and since I don't use dull seam rippers, I don't have to worry about cutting fabric instead of thread. (If you've not tried this, do.  You'll love it!)


Trim seam allowance and sew the second square on. Check against Eleanor's ruler.

Verdict:  The second method saved over five minutes per pair of geese.  The second method also gave me four more half square triangle blocks for some other project.  I make that seam before I press and trim off the excess.

I did sew together too many flying geese units on one side, so I used my ripping technique again.  I think most people have been taught to keep the red ball of the ripper on top, but ripping with it on the underside saves sooooo much time.

The other two methods of making geese are perfectly fine, but now I know which method is faster.

I have the fishing panel with its flying geese borders finished, and am waiting for batting and backing to arrive. While I was hopeful that my college girl would hold it so I could get a photo while she was home for Thanksgiving, that didn't happen, but we had a joyful Thanksgiving.
I need to figure out a way to create a wall for taking photos of my quilts somewhere in this small house.  I've photographed a lot of quilt tops and quilts outside, but with winds up to 55 mph today, the outside is definitely not a choice. (Driving to and from church was a bit unpleasant today; we're experiencing the first of three consecutive storm systems.  Hopefully, they'll be through here by Thursday or so!)

Happy quiltmaking, knitting, sewing, and crafting,

Friday, November 25, 2016

Quick Snapshots of Christmas Quilt

I do need a wall that's big enough and free of other things so I can do quilt photos.
This is a Christmas quilt--despite the fact that over 35 years ago I said I'd never make a Christmas quilt! Too much time required to make one for too little time to use it, I reasoned.

I changed my mind two years ago when I found these pre-printed panels, mostly because I knew from previous "Bob Warr" quilts that the piecing would go quickly..
 I added two borders to each block.  Except for the red triangles, the fabrics are from my treasured fabrics from the late 1980s.

 Then I added a border of a wintry gray fabric from the 1990s. (No, I did not choose the best spot to photograph, but the fact that I didn't notice, says something about how forgiving the fabric is.)  I was not especially pleased with the gray quilting, so I tried something different in the other three borders.

 There I used a pale blue thread that just lit up the gray border fabric.

 For the quilted areas around the blocks I used swirlies that go quickly and are ever so much fun to do.

For the binding I cut the red fabric 1.75 inches wide and the green fabric 1.5 inches wide.  After seaming them together, I pressed the seam allowance toward the red and then pressed the edges together--which created faux piping about 1/8th inch wide.

I used Glide quilting threads.

Binding on at last--after the quilt languished for about two years! Now that it's bound and ready for snuggling, I'm thinking there's a good possibility that I'll make another Christmas quilt--or at least a winter themed quilt.

So, I'm quite happy to have a Christmas quilt with colors that will make it useful well into January. I'm just as happy to have a binding on it that required no hand stitching!  (Back when I did hand piecing and hand quilting, I think I was in denial about my own mortality and didn't realize that the ideas will always come much more quickly than the time to execute them!)

Thanksgiving weekend is flying by!  I spent yesterday baking several batches of rolls before we joined friends for Thanksgiving dinner with our twenty-something children, friends, and loved ones.
This morning the college girl and I were at Busy Bee Quilts shortly after seven for the only Black Friday sale that interested me and then went to East Mountain Grill for a little breakfast.  She studied for a while and then went off to see the latest Harry Potter movie with friends while I worked on quilt binding. I'm hopeful that in three weeks when winter break begins I'll have plenty of energy for more quiltmaking.

I hope you all experience a very blessed weekend as well!

Happy quiltmaking, knitting, and creating,
Related Posts Plugin for WordPress, Blogger...